SSO Configuration
This section will provide an introduction into the IDM SSO (Single-Sign On) option. It will detail:
How to access the SSO configuration area
Overview and description of each field in the configuration area
How to configure the SSO settings
How to bypass third party authentication, this includes LDAP (Lightweight Directory Access Protocol) and SSO (Single Sign-On).
SSO Configuration Access
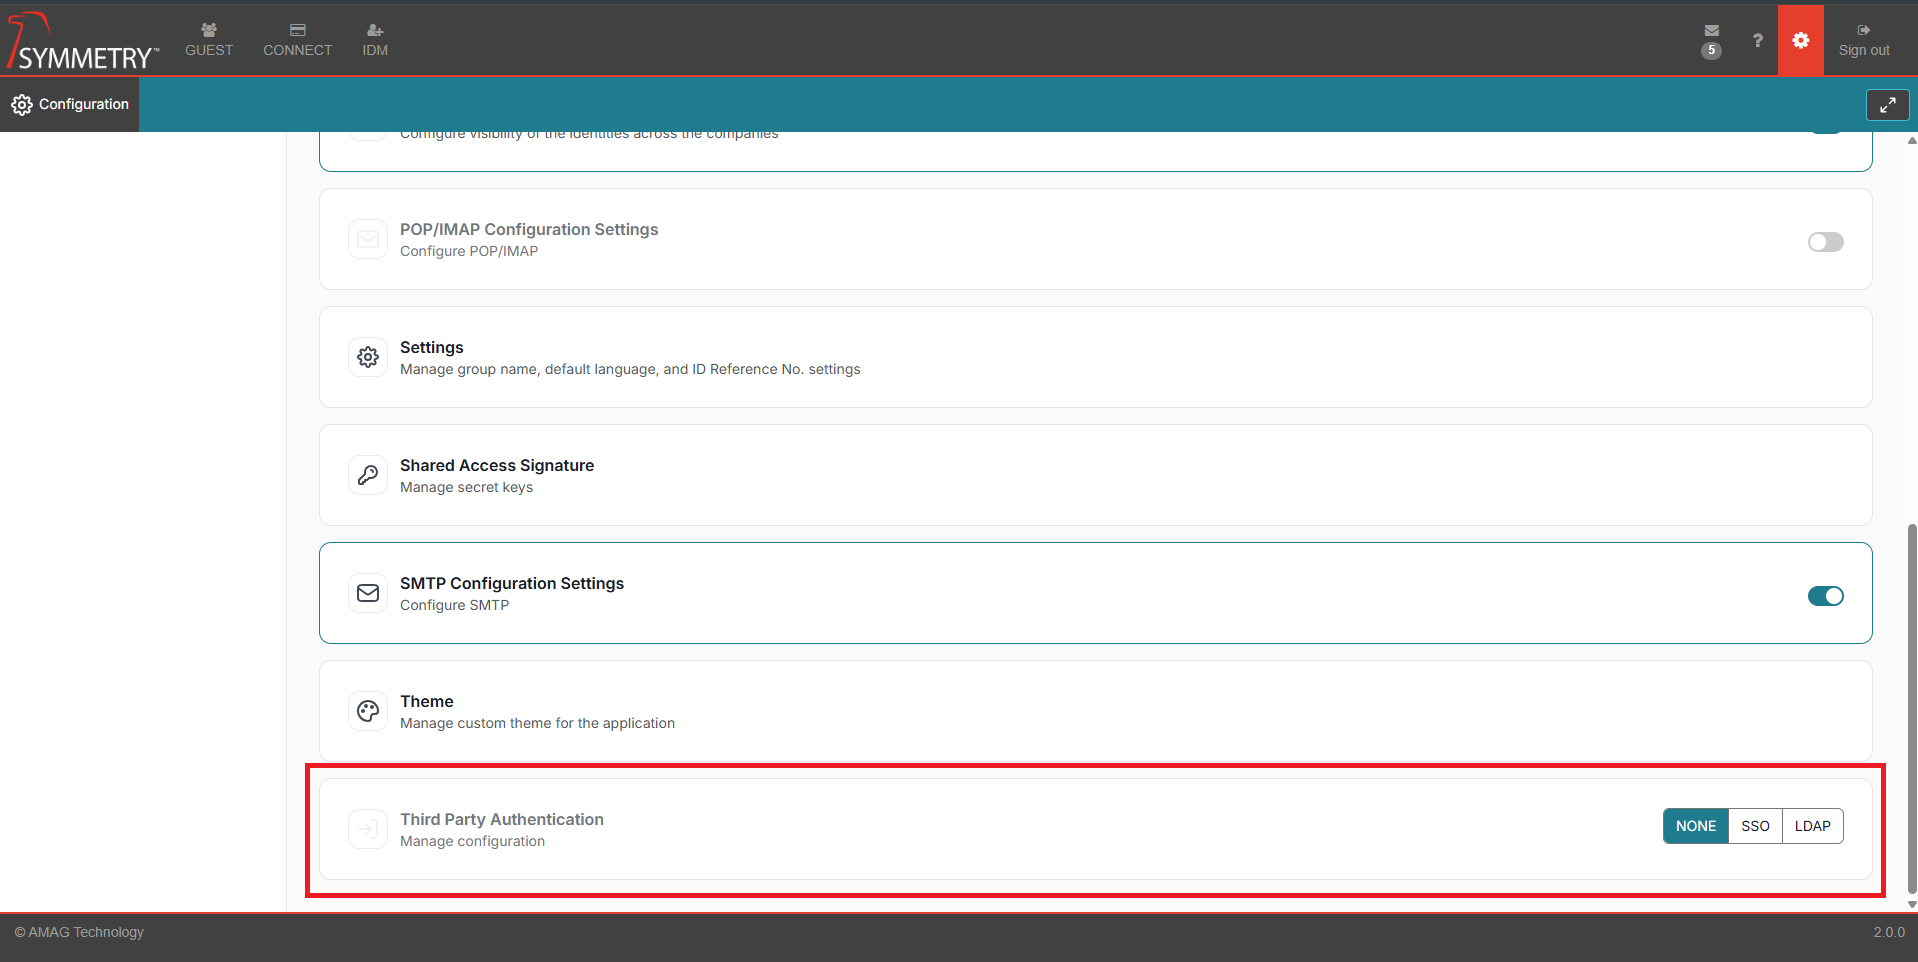
Select the Configuration/Settings icon, located at the top right of the screen.
Select the System Settings section.
Select the Third Party Authentication and toggle the option to select SSO.
Enter the Third Party Authentication section to manage the configuration process.
SSO Configuration Screen Descriptions
Note
Required fields are indicated with a red Asterisk.
A brief overview of each editable field in the IDM > Configuration section.
After any changes or edits made to the configuration settings press Update button then the Save button to confirm the changes. Or click the Cancel button to disregard any changes.
Third Party Authentication Settings:
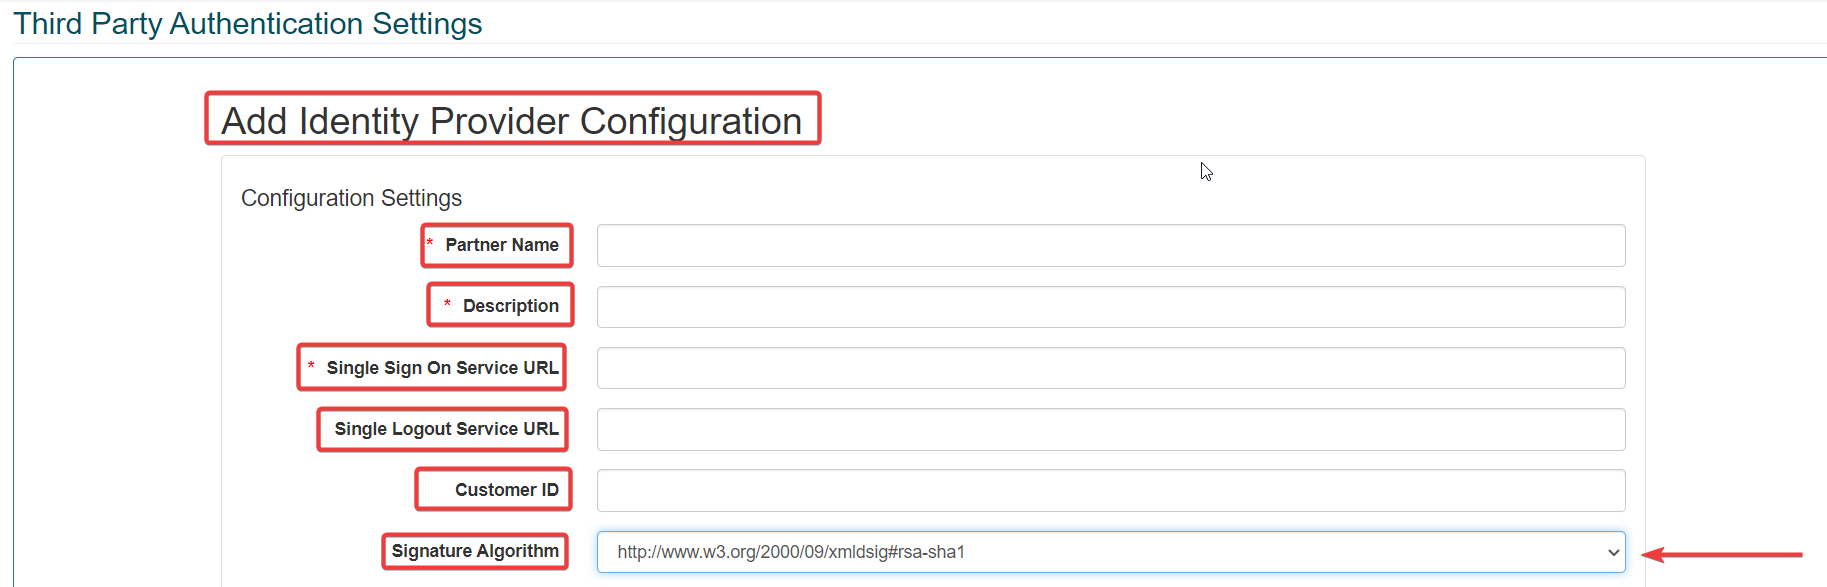
Partner Name: Required to be the the entity id sent in the SAML message, This can be obtained from the meta data.
Description: A description of the connection.
Single Sign On Service URL: The URL that the customer will go to when logging in, this should be able to be obtained via the Metadata if not the customer will need to provide it.
Single Logout Service URL: The URL for the Single Logout return. This is a URL on the service provider where its sign out response is sent (as a POST operation).
Customer ID: The ID (identification) of the customer/user.
Signature Algorithm: The digital Algorithm is a cryptographic algorithm used to generate digital signatures, authenticate the sender of a digital message, and prevent message tampering.
Signature Algorithm: The digital Algorithm is a cryptographic algorithm used to generate digital signatures, authenticate the sender of a digital message, and prevent message tampering.
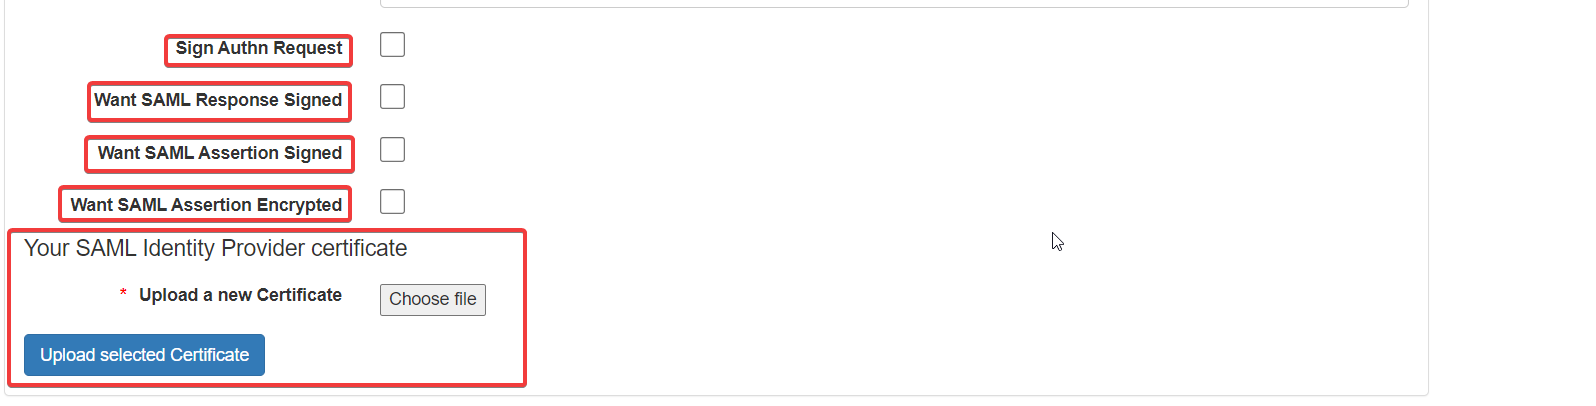
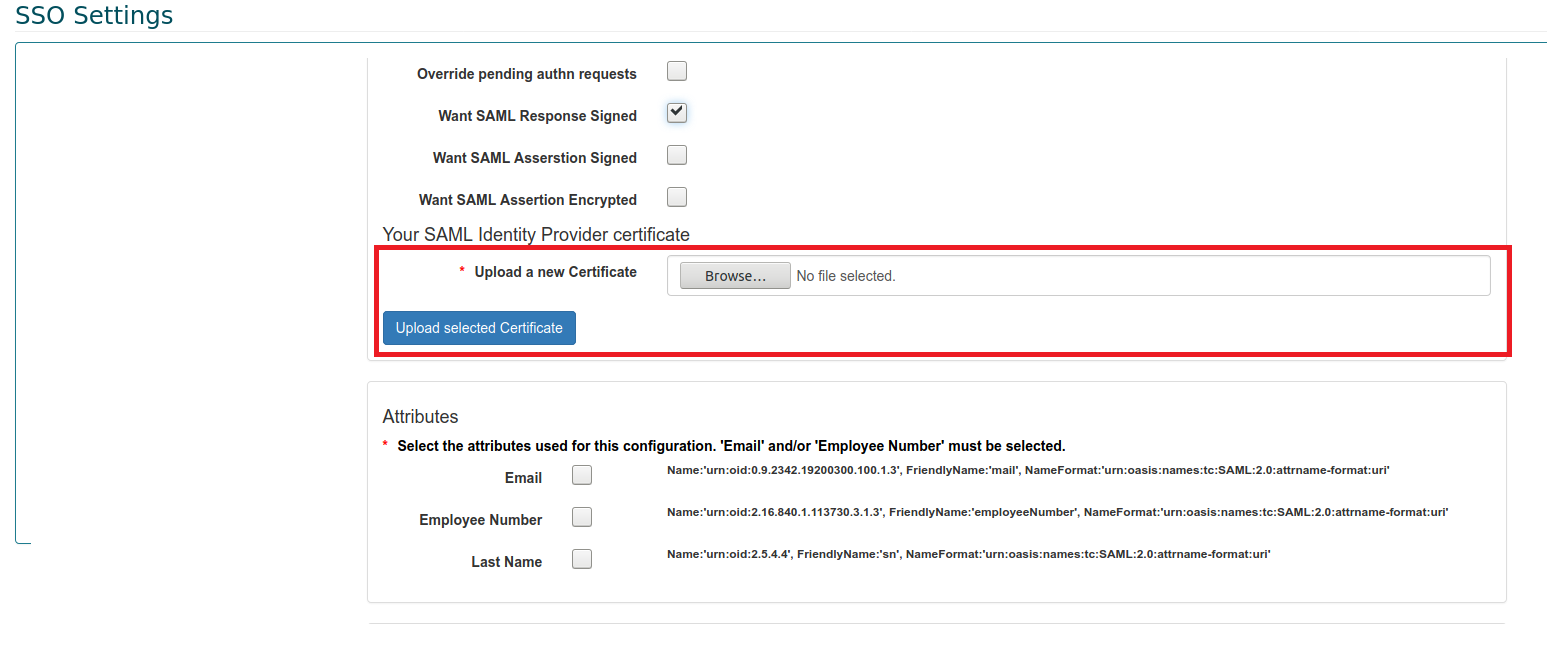
Want SAML Response Signed: Enable or Disable the requirement of a signed SAML response. (The details here must be the same on the IDP service provider)
Want SAML Assertion Signed: Enable or Disable the requirement of a signed SAML assertion response. (The details here must be the same on the IDP service provider)
Want SAML Assertion Encrypted: Enable or Disable the requirement of a signed encrypted SAML assertion response. (The details here must be the same on the IDP service provider)
Your SAML Identity Provider certificate: Allows the user to upload the provided certificate file. (The details here must be the same on the IDP service provider)
Attributes:
Note
Email or/and Employee Number must be selected.
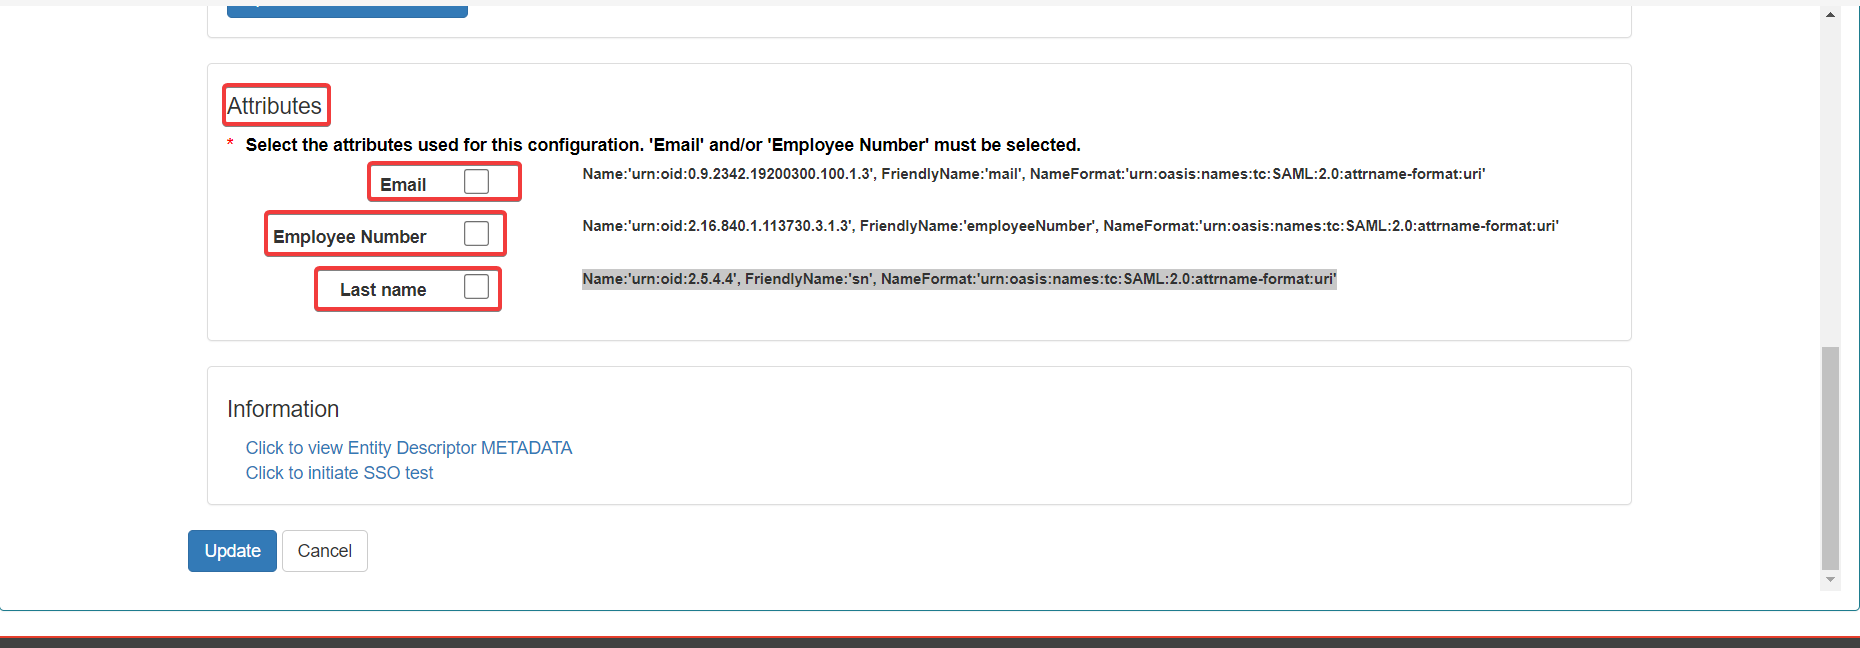
Email: Email address of the users/identities - Name:'urn:oid:0.9.2342.19200300.100.1.3', FriendlyName:'mail', NameFormat:'urn:oasis:names:tc:SAML:2.0:attrname-format:uri' (The details here must be the same on the IDP service provider)
Employee Number: Employee number of the users/identities - Name:'urn:oid:2.16.840.1.113730.3.1.3', FriendlyName:'employeeNumber', NameFormat:'urn:oasis:names:tc:SAML:2.0:attrname-format:uri' (The details here must be the same on the IDP service provider)
Last Name: Last name of the users/identities - Name:'urn:oid:2.5.4.4', FriendlyName:'sn', NameFormat:'urn:oasis:names:tc:SAML:2.0:attrname-format:uri' (The details here must be the same on the IDP service provider)
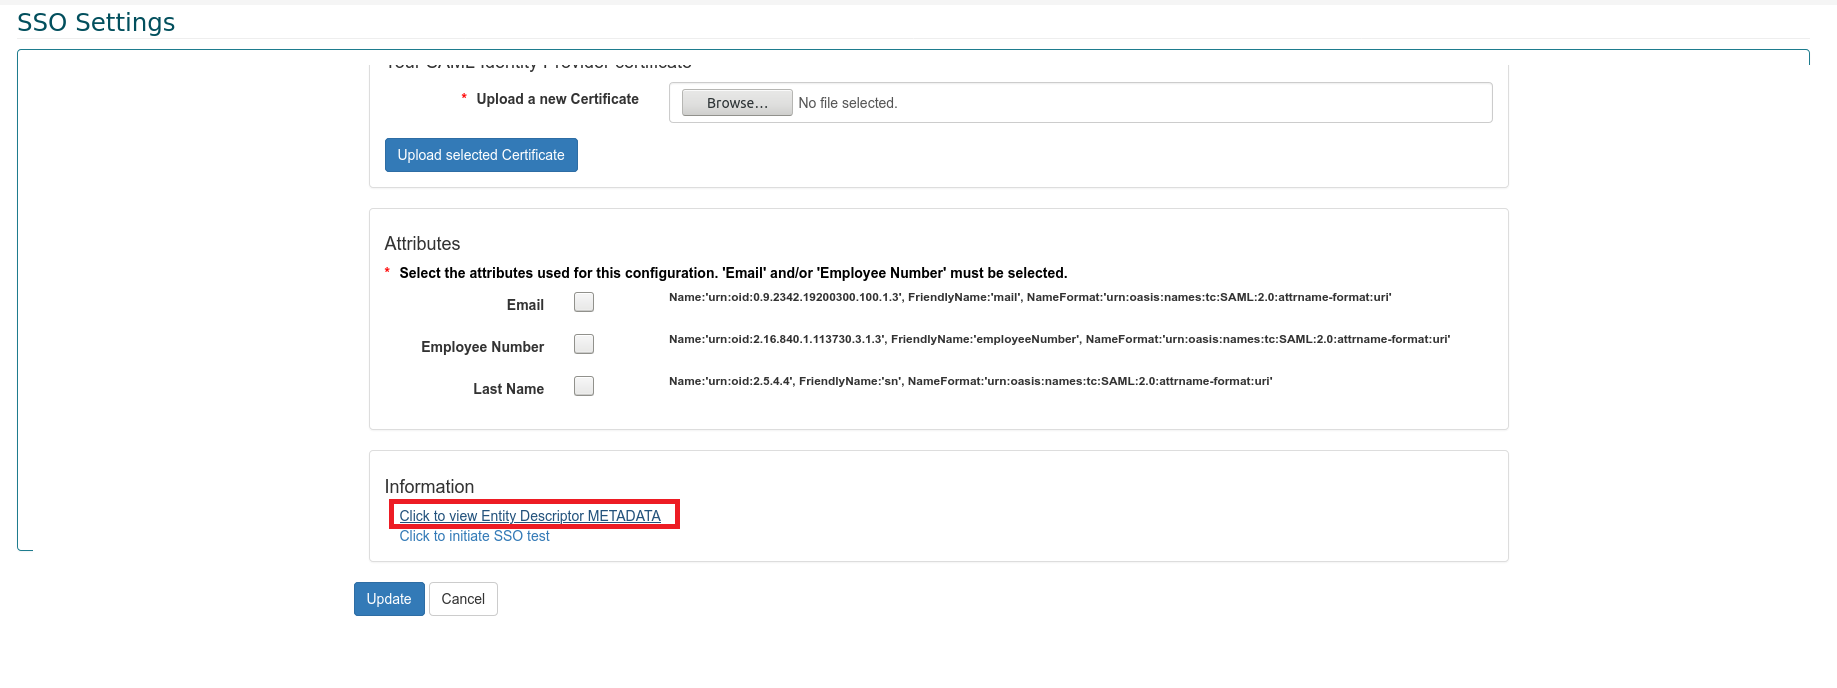
Information

Click to view Entity Descriptor METADATA
Click to Initiate SSO test
SSO Configuration
Warning
The SSO (Single Sign On) settings should only be edited by users who already have a fundamental understanding of the requirements required to set up the SSO function.
Warning
It is strongly recommended setting at least one account to Allow SSO Bypass/Allow Third Party Authentication Bypass while configuring SSO to prevent the risk of being locked out of your account. This can be done via the the IDM tab once SSO has been enabled by the following steps:
Warning
The user must be a System Administrator to perform the following steps.
Note
Required fields are indicated with a red Asterisk.
There are several steps that are assumed to be completed prior to configuring SSO in IDM, these are as follows:
A customer has been created using the Customer Management module.
A user or users exist in the IDM product with valid email addresses and have employee numbers assigned.
The Customers IDP (Identity Provider) is configured and a administrator account has been enrolled.
Note
There are multiple IDP applications that can be used and these should be configured by a user who is proficient in the configuration of the IDP and SSO functions. In the following steps JumpCloud® is used as the IDP (Identity Provider) to allow examples to be described and captured with images.
Obtaining IDM Metadata
Navigate to Configuration > System Settings > Third Party Authentication Settings (SSO). Toggle the option to the On position. then click the Third Party Authentication Settings link to enter the configuration screen.
Make a note of the SHA Algorithm (Secure Hashing Algorithm) as it will be required to match the Signature Algorithm within the IDP
Scroll to bottom of the screen and Right-Click the Click to view Entity Descriptor METADATA link. Select to option to open in a new tab.
Right-Click on the page and select Save Page As..... Save as file with .xml extension.
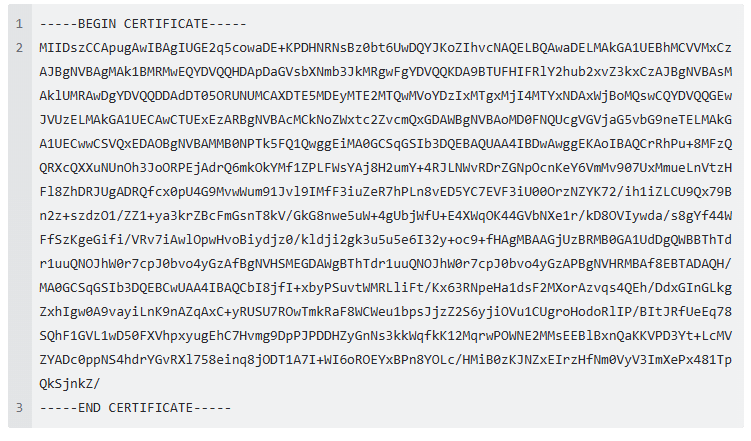
Highlight the content of the X509Certificate element and copy and paste into a text file. Edit the file to comply with the PEM (Privacy Enhanced Mail) certificate format as shown in the example (image) below. Save the text file with a .cer extension.
Setting Up IDP Application
Note
In the following steps JumpCloud® is used as the IDP (Identity Provider) to allow examples to be described and captured with images.
There are multiple IDP applications that can be used by the user. Any configuration of the IDM SSO or the IDP application should be completed by a user who is proficient in the configuration of the IDP and SSO functions.
The following steps will detail the setting up process using JumpCloud® as the IDP. The process will be similar for other IDP applications.
Log in to IDP application (JumpCloud®) as an administrator user.
Create a user/identity that corresponds to a user/identity account in IDM. The Email and Employee number is required to match exactly between the IDP (JumpCloud®) and the IDM accounts.
Select the User Groups tab and select the check box next to a group to associate the user with that group.
Navigate to the Applications tab and create a new SAML application.
Click the Add (+) button to add application.
Type SAML in the search bar.
Click the Configure button on the Custom SAML App option that is displayed.
Enter a Display Name for your SAML App.
Click Upload Metadata and then select the metadata XML file created in the Obtaining IDM Metadata section previously.
Enter an IDP Entity ID into the correct field.
Click the Upload SP Certificate button and select the .cer file created in the Obtaining IDM Metadata section previously.
Enter the Email option from the drop down selection in the SAMLSubject NameID field,
Update and the Signature Algorithm in JumpCloud® to match the Signature Algorithm in IDM.
Select the Declare Redirect Endpoint check box.
If required, customize the IDP URL to avoid conflict with other applications.
Input the SHA Algorithm (noted from IDM in the Obtaining IDM Metadata section previously) value into the Signature Algorithm field.
Add two user attributes under USER ATTRIBUTE MAPPING:
Jumpcloud attribute name: email; Service Provider attribute name: urn:oid:0.9.2342.19200300.100.1.3
Jumpcloud attribute name: employeeIdentifier; Service Provider attribute name: urn:oid:2.16.840.1.113730.3.1.3
Click the Activate button.
Open the Application you just created.
Expand the Single Sign-On Configuration section.
Click the Export Metadata button to export the metadata and save as a .xml file.
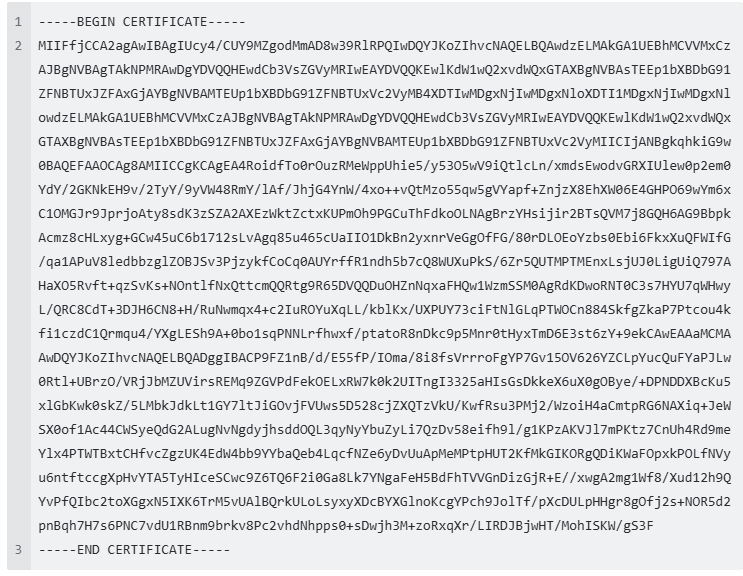
Open the JumpCloud® metadata xml file. Highlight the content of the X509Certificate element and copy and paste into a text file. Edit the file to comply with the PEM (Privacy Enhanced Mail) certificate format as shown in the example (image) below. Save the text file with a .cer extension.
Click the User Groups tab and select the check the box next to the same group selected previously, to associate it with the app.
Configuring the SSO Settings in IDM
Navigate to Configuration > System Settings > Third Party Authentication Settings (SSO). Toggle the option to the ON position. Then click the Third Party Authentication Settings link to enter the configuration screen.
Copy and paste the IDP Entity ID from the IDP application (Jumpcloud IDP was used in this demonstration) in to Partner Name field in the IDM SSO configuration page.
Copy and paste the IDP Entity ID from the IDP application (Jumpcloud IDP was used in this demonstration) in to Description field in the IDM SSO configuration page.
Copy and paste the IDP URL value from IDP application (Jumpcloud IDP was used in this demonstration) in to the Single Sign On Service URL field in the IDM SSO configuration page.
Selecting/Checking the Want SAML Response Signed assertion signature is optional. Refer to the corresponding option in the IDP application.
Make sure the Signature Algorithm matches and corresponds with the Signature Algorithm within the chosen IDP application.
Click the Upload selected Certificate button to upload the IDP certificate (the certificate must be a .cer file). Select the certificate file for the IDP Certificate created in the IDP application.
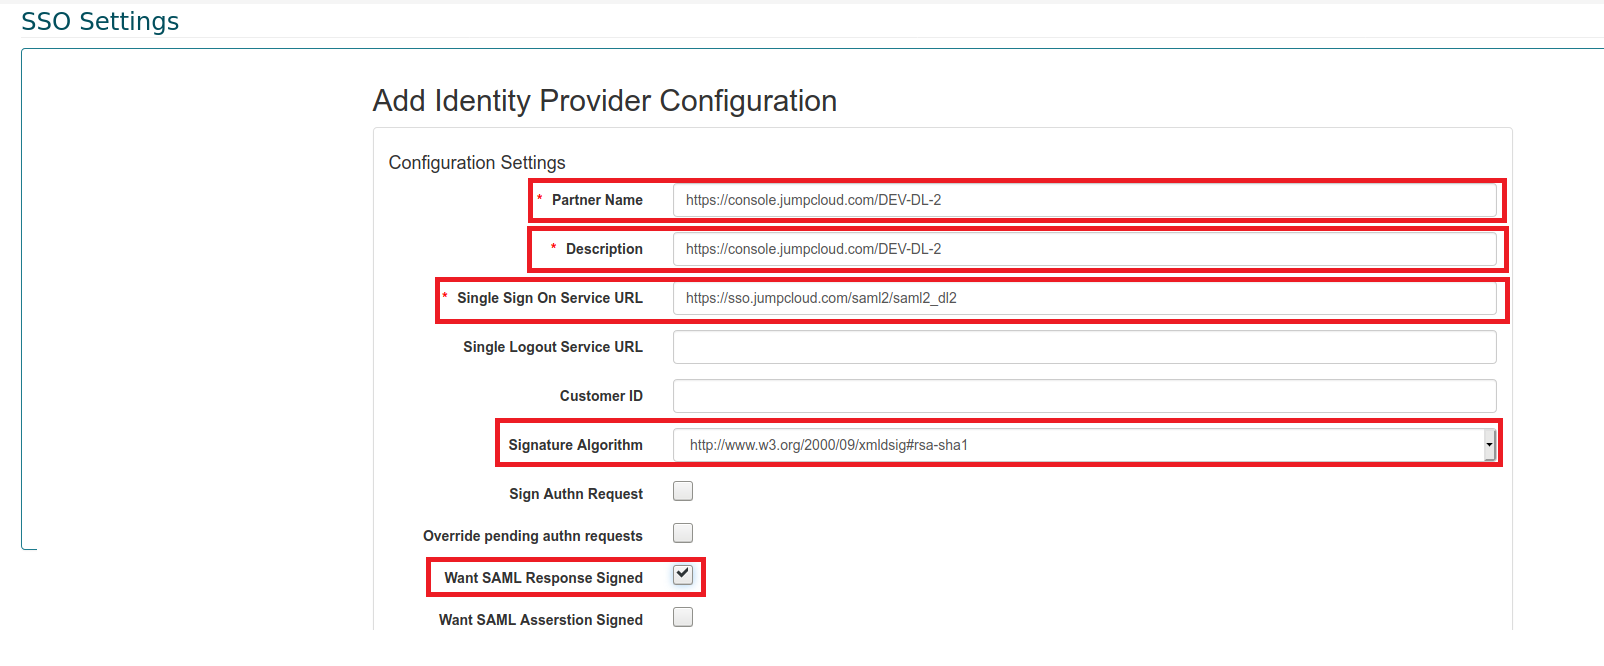
Select any number of desired attributes (Email and/or Employee Number must be selected),
Once all updates are made click the Update button to save the SSO configuration.
Testing
Warning
It is strongly recommend to set at least one account to Allow SSO Bypass while configuring SSO to prevent the risk of being locked out of your account. This can be done via the IDM tab once SSO has been enabled.
The SSO configuration section has a built in automated test, which will automatically test and compare the SSO information. Click the Click to initiate SSO test button in the Information section of the SSO configuration page.

It is advised to complete a test sign in process with an IDP test user, implementing the SSO process to test the configuration has been completed correctly.
When testing, make sure that the identity used in testing has the relevant attribute configured. Also, if possible it is recommended to capture a SAML message being sent, this can be used to match against AMAG’s internal settings if any issues occur.
Bypass SSO Login
Warning
The user must be a System Administrator to perform the following steps.
The following steps instruct the user how to allow or to bypass third party authentication, this includes LDAP (Lightweight Directory Access Protocol) and SSO (Single Sign-On).
Select the IDM tab at the top of the screen.
Select the Identities tab.
Navigate to the Login Credentials section on the Identity screen and click on the Edit button.
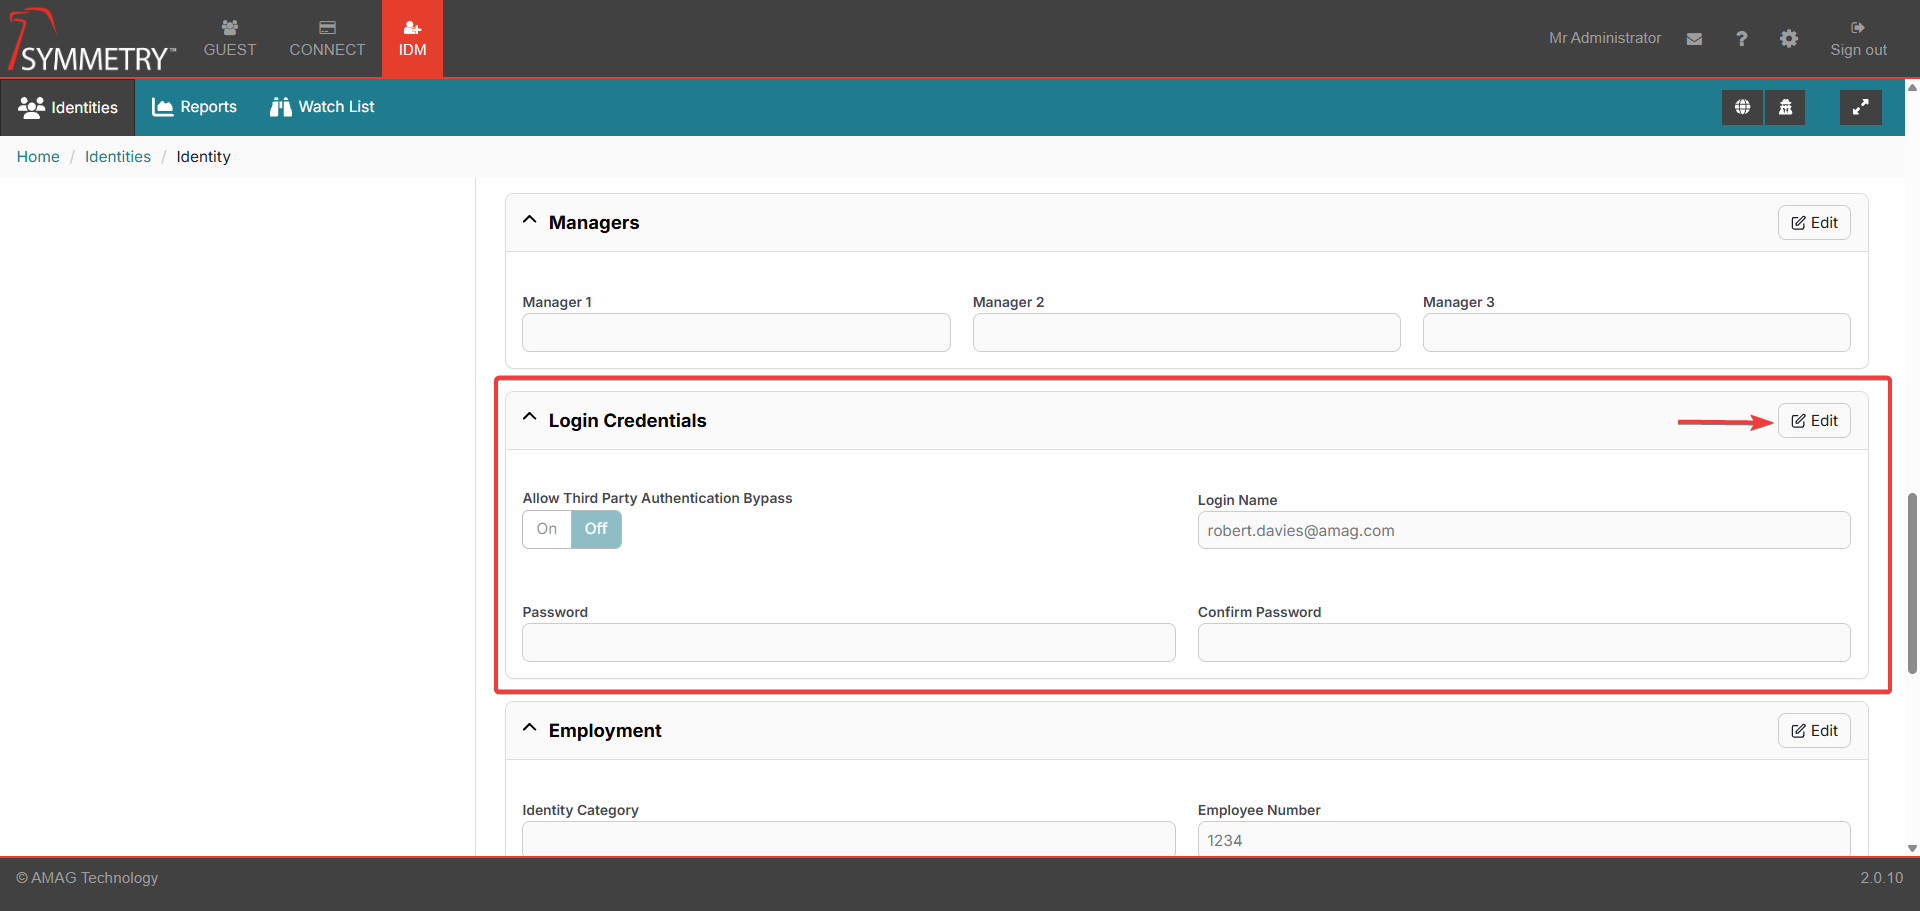
Toggle the Allow Third Party Authentication Bypass button to either On or Off as required.
Note
The change will be confirmed with a note (Updated Third Party Authentication Bypass) in the top right corner of the screen, as shown in the graphic below.
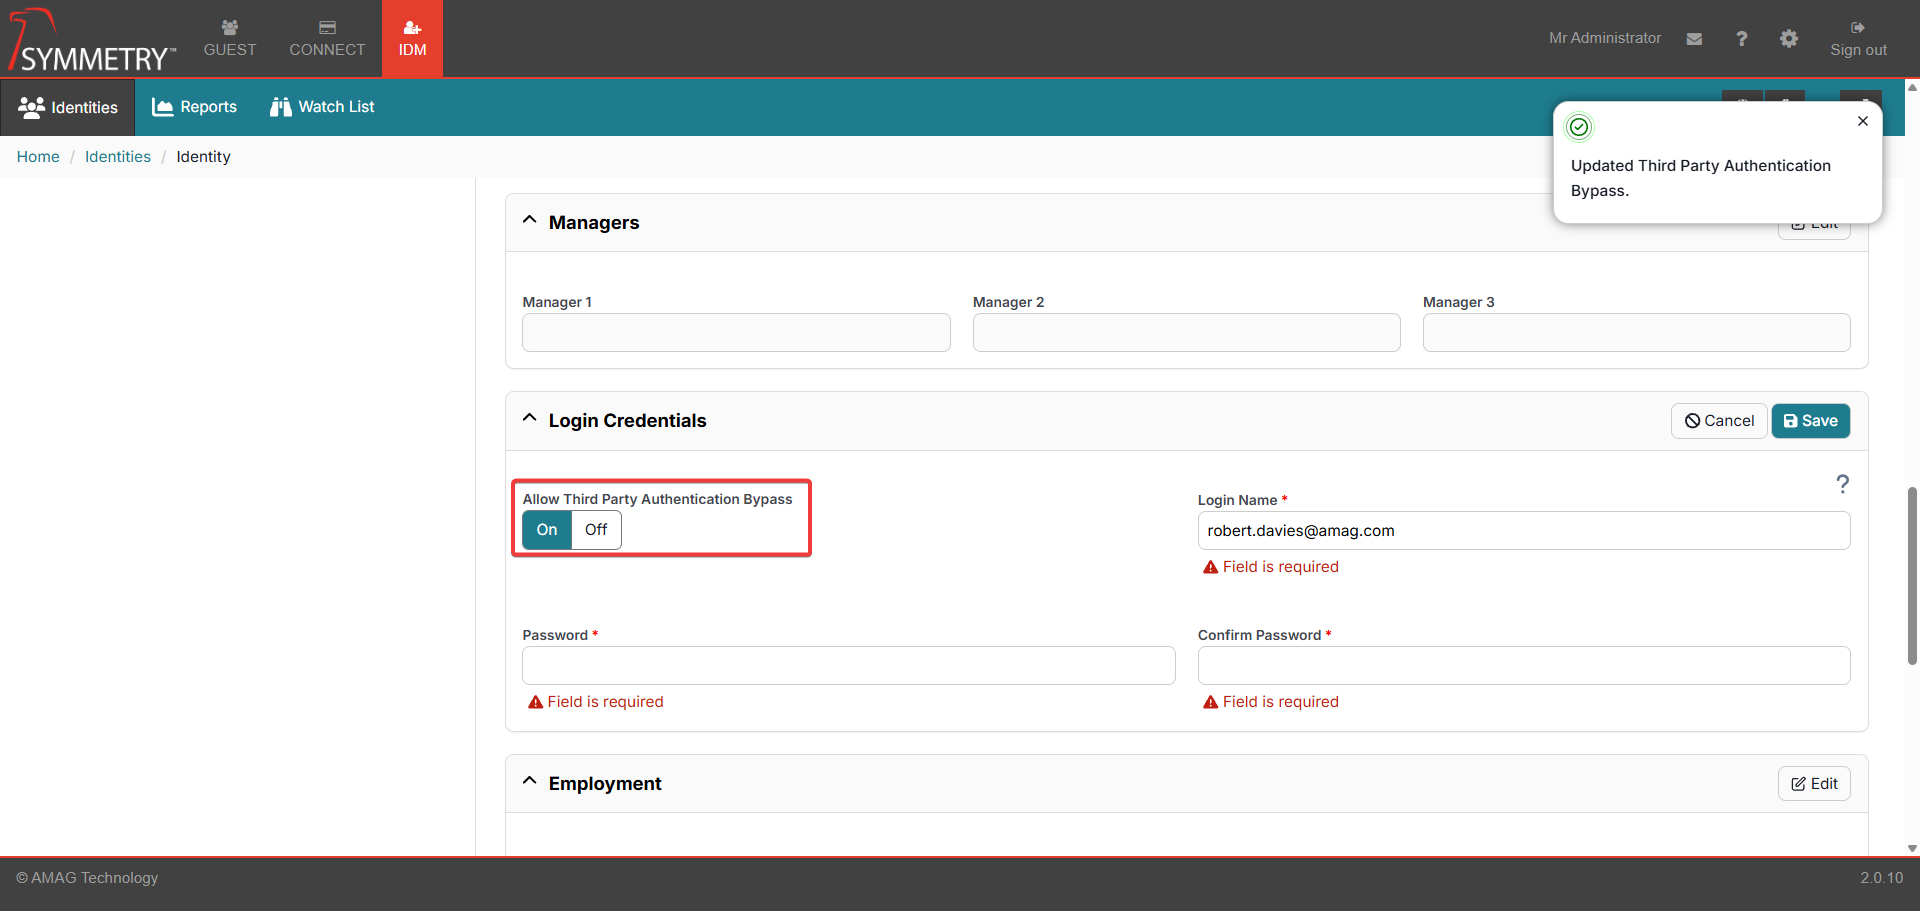
Provide user credential details to the blank fields and then click the Save button to confirm and apply the change.
Login Name:Users login name
Password: Users password
Confirm Password: Users Password (this field must match the password field)