Symmetry Integration Client
Note
If required, refer to the Symmetry help guide provided with the Symmetry system for further information.
Overview:
The AMAG.Symmetry.Client is a Windows service that communicates with Symmetry and exchanges data between Symmetry CONNECT / GUEST and Symmetry. The service communicates over HTTPS (443) and communicates both with SymmetryCONNECT.com and Microsoft Azure Service Bus. The service has 2 roles:
Queries Azure (Hosted) or RabbitMQ (On-Premise) for commands.
Queries Symmetry for database changes to access codes and uploads changes to GUEST/CONNECT.
CONNECT/GUEST System Architecture Diagram (Hosted)
Preparation of Symmetry SMS Access Control System
The following Personal Data Fields (PDF’s) must be configured in Symmetry SMS prior to using the integration. To configure the PDF’s, navigate to Symmetry>Setup>Identity>Personal Data>Card Holder Titles.
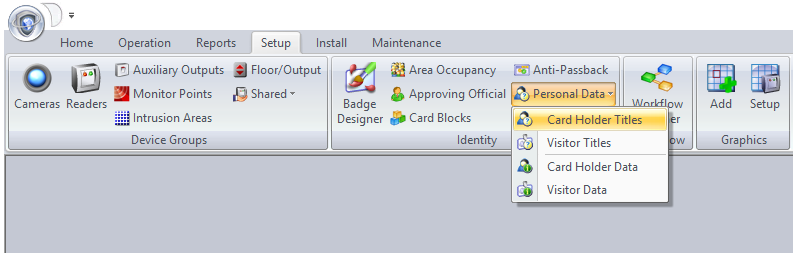
Configure PDF 48 – 50 as follows:
PDF 48: Source
PDF 49: IdentityId
PDF 50: VisitId
Note
It is also recommended to have at least one Access Group created within the local Symmetry System so a valid test can be performed after installing the integration service. The Access Group needs to contain at least one reader.
Preparation of Symmetry CONNECT/IDM/GUEST
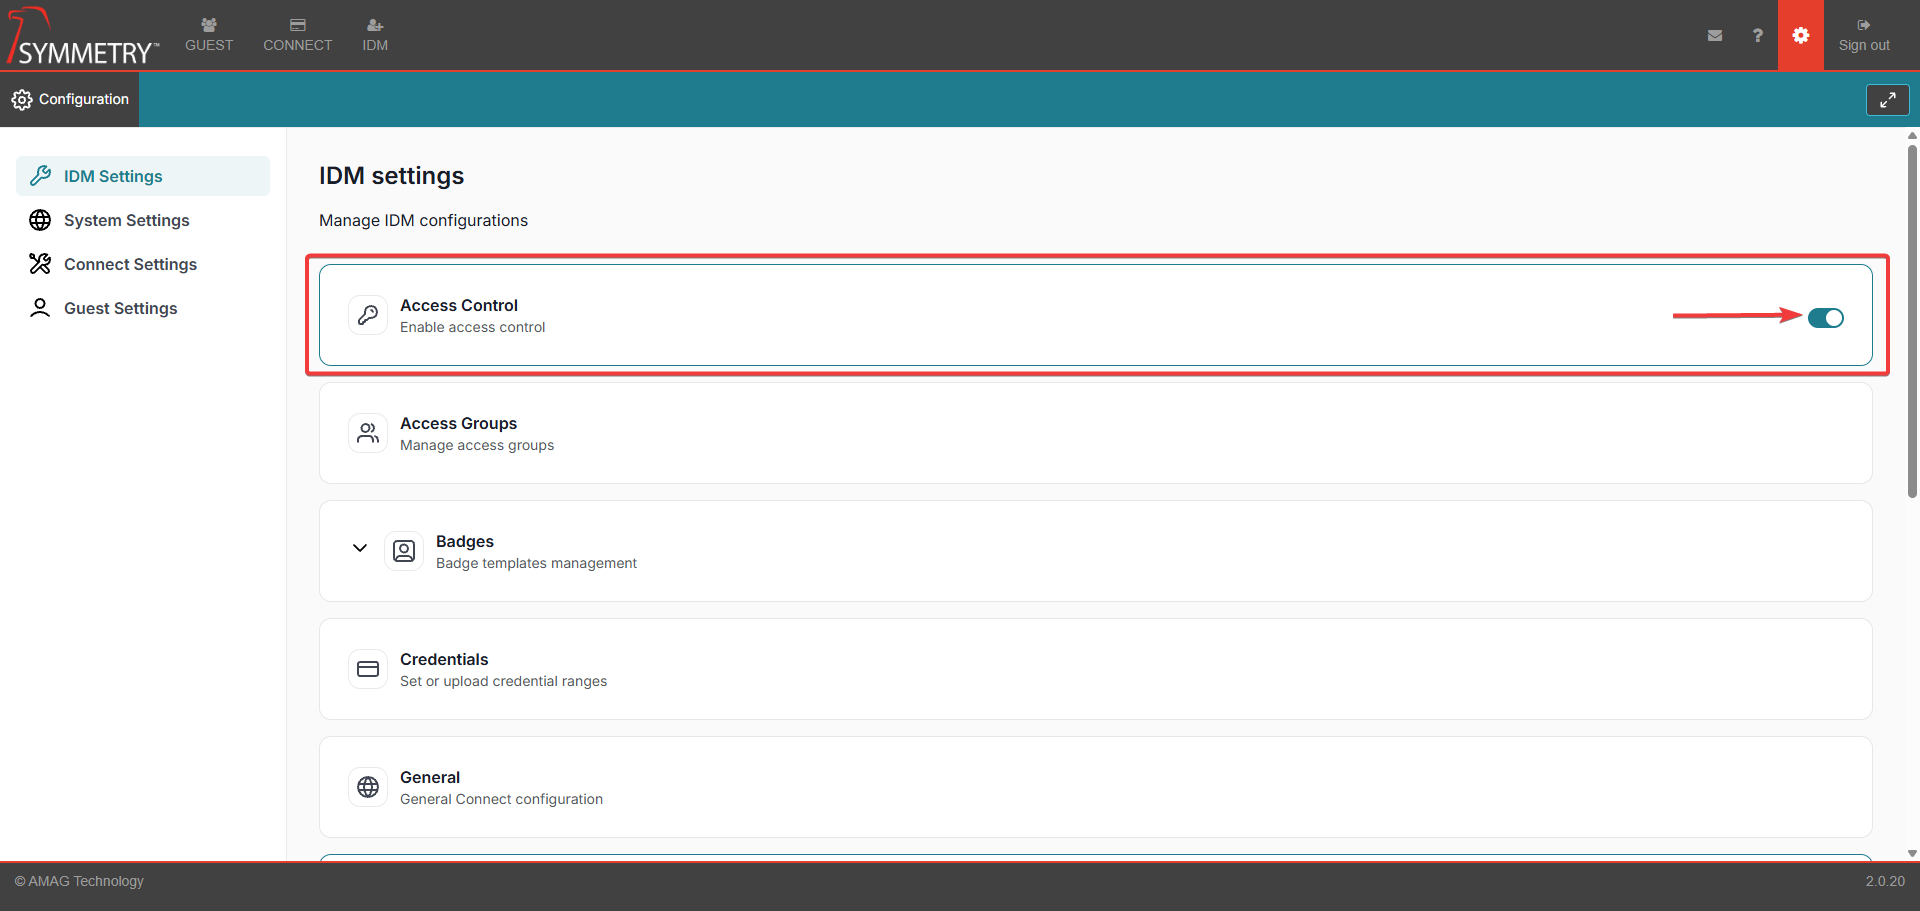
Log into Symmetry CONNECT/GUEST/IDM and navigate to the Configuration > IDM Settings > Access Control . If not already enabled, turn on the Access Control Integration by toggling the switch to the ON position, then click on the Access Control link.
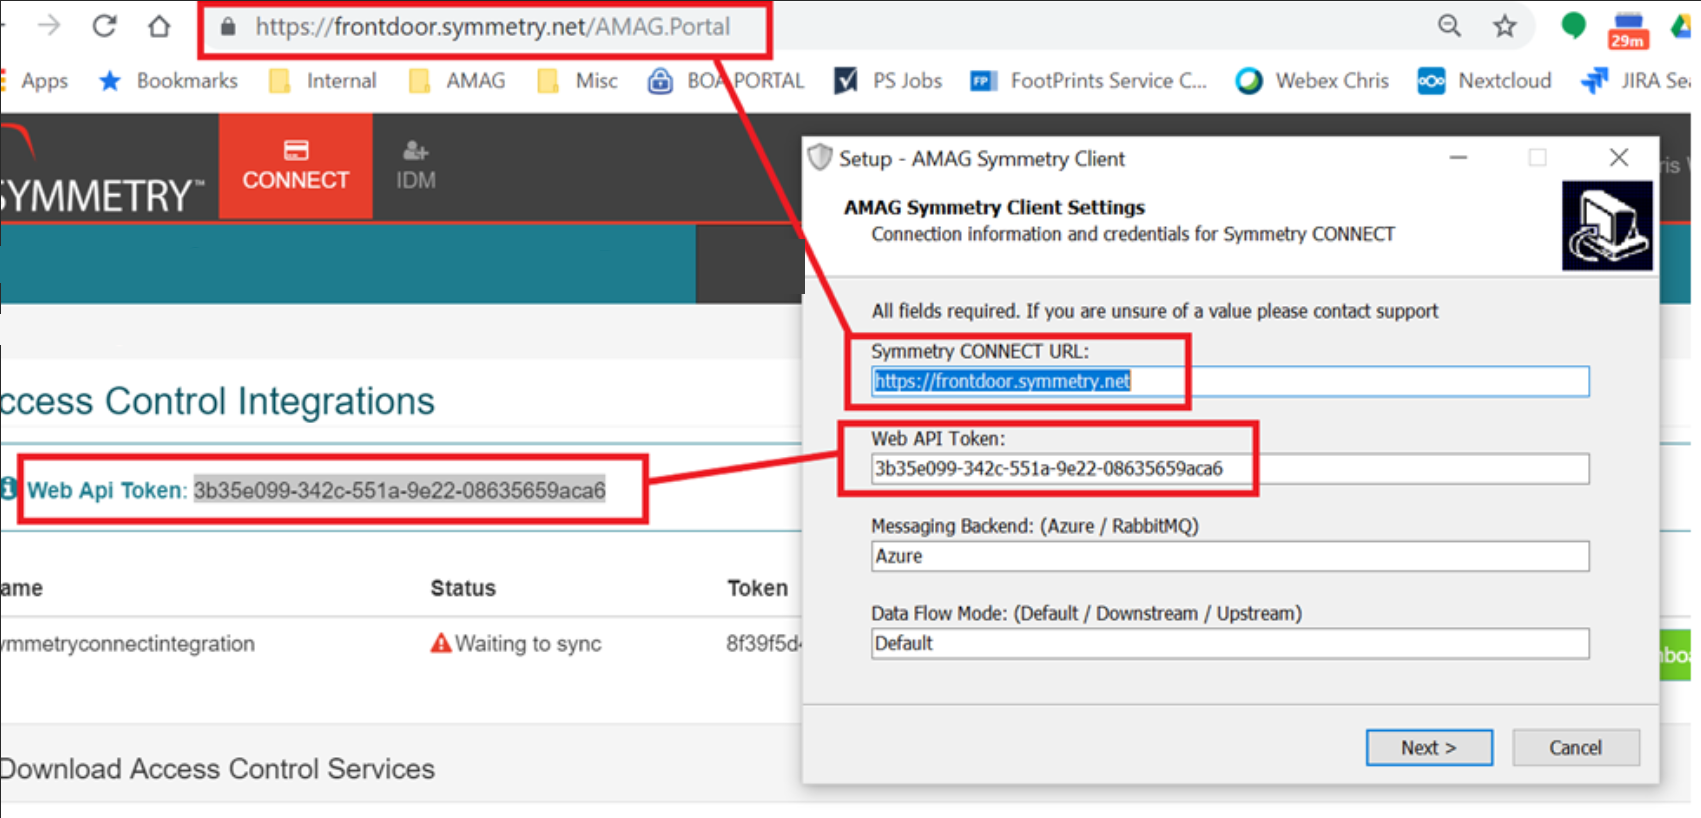
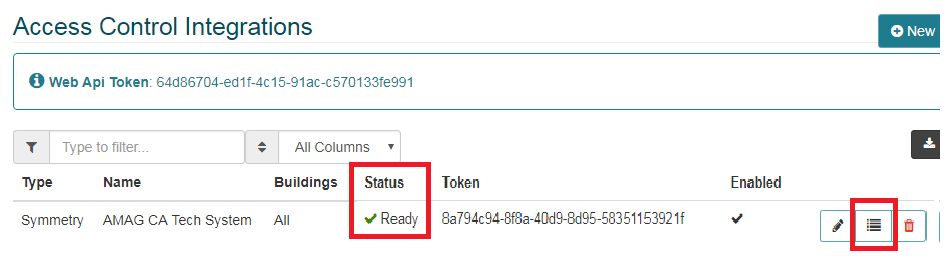
Locate the Web API Token that represents the users system. This will be required later when setting up the settings.config file.
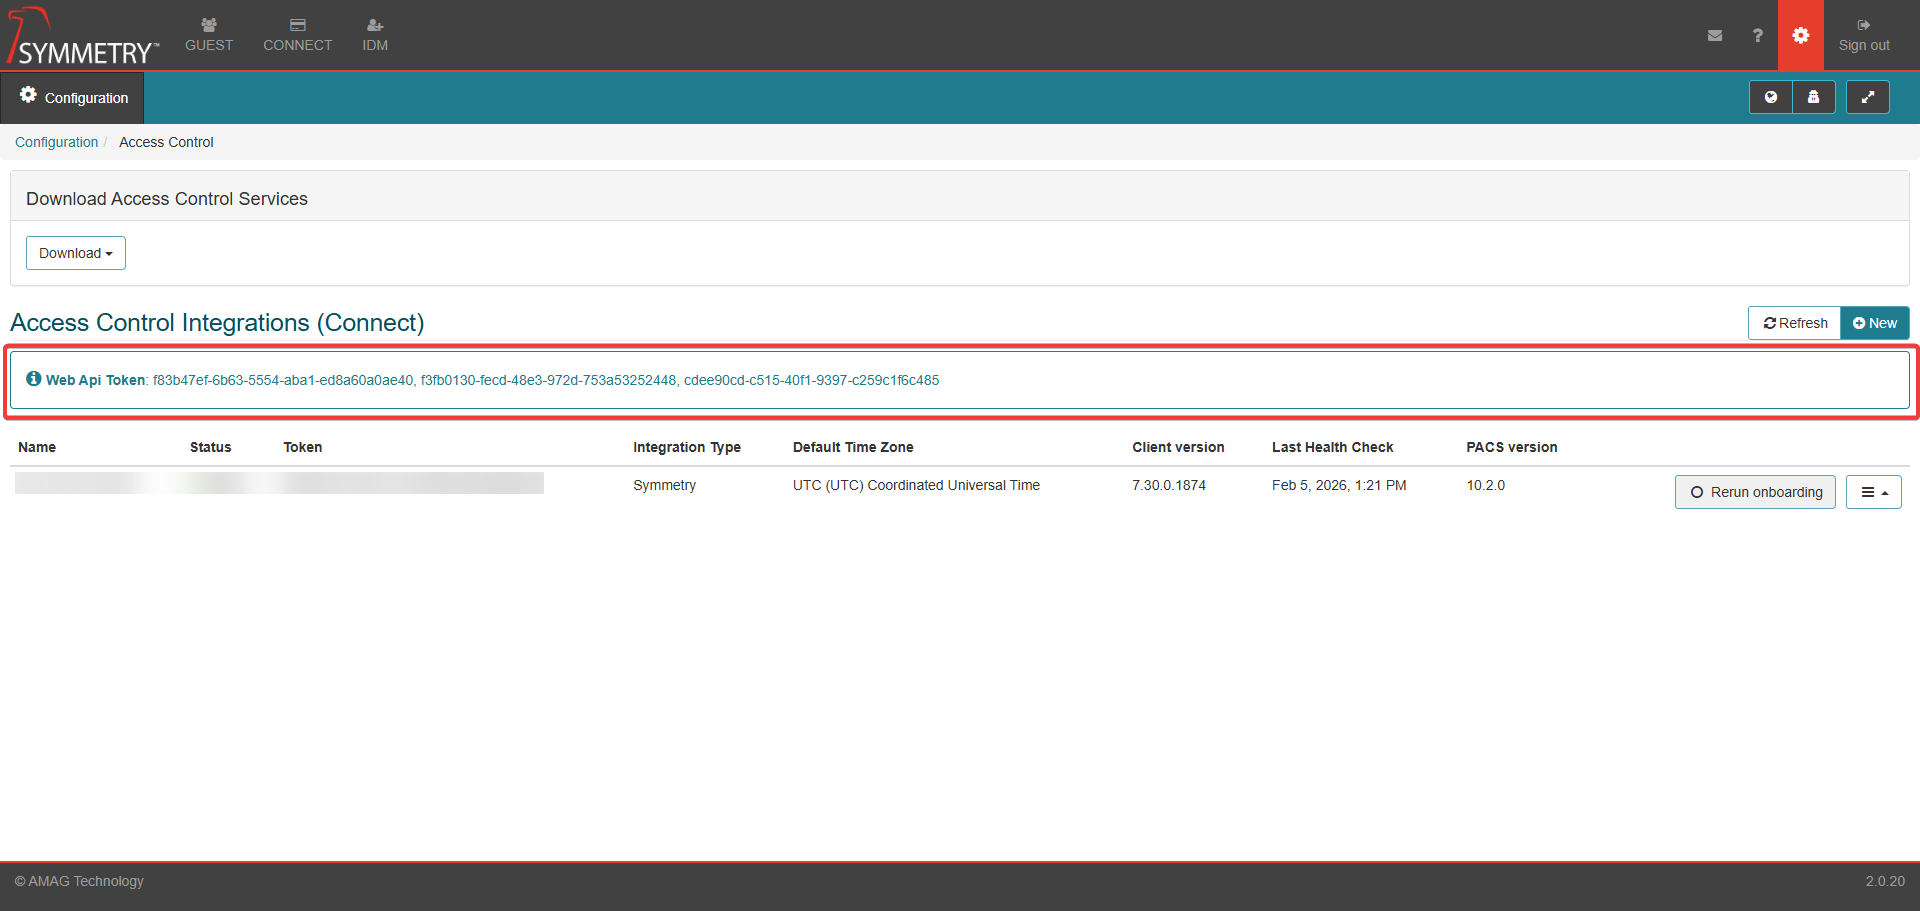
Create an Access Control Integration. Click on the New button in the Configuration Access Control screen.

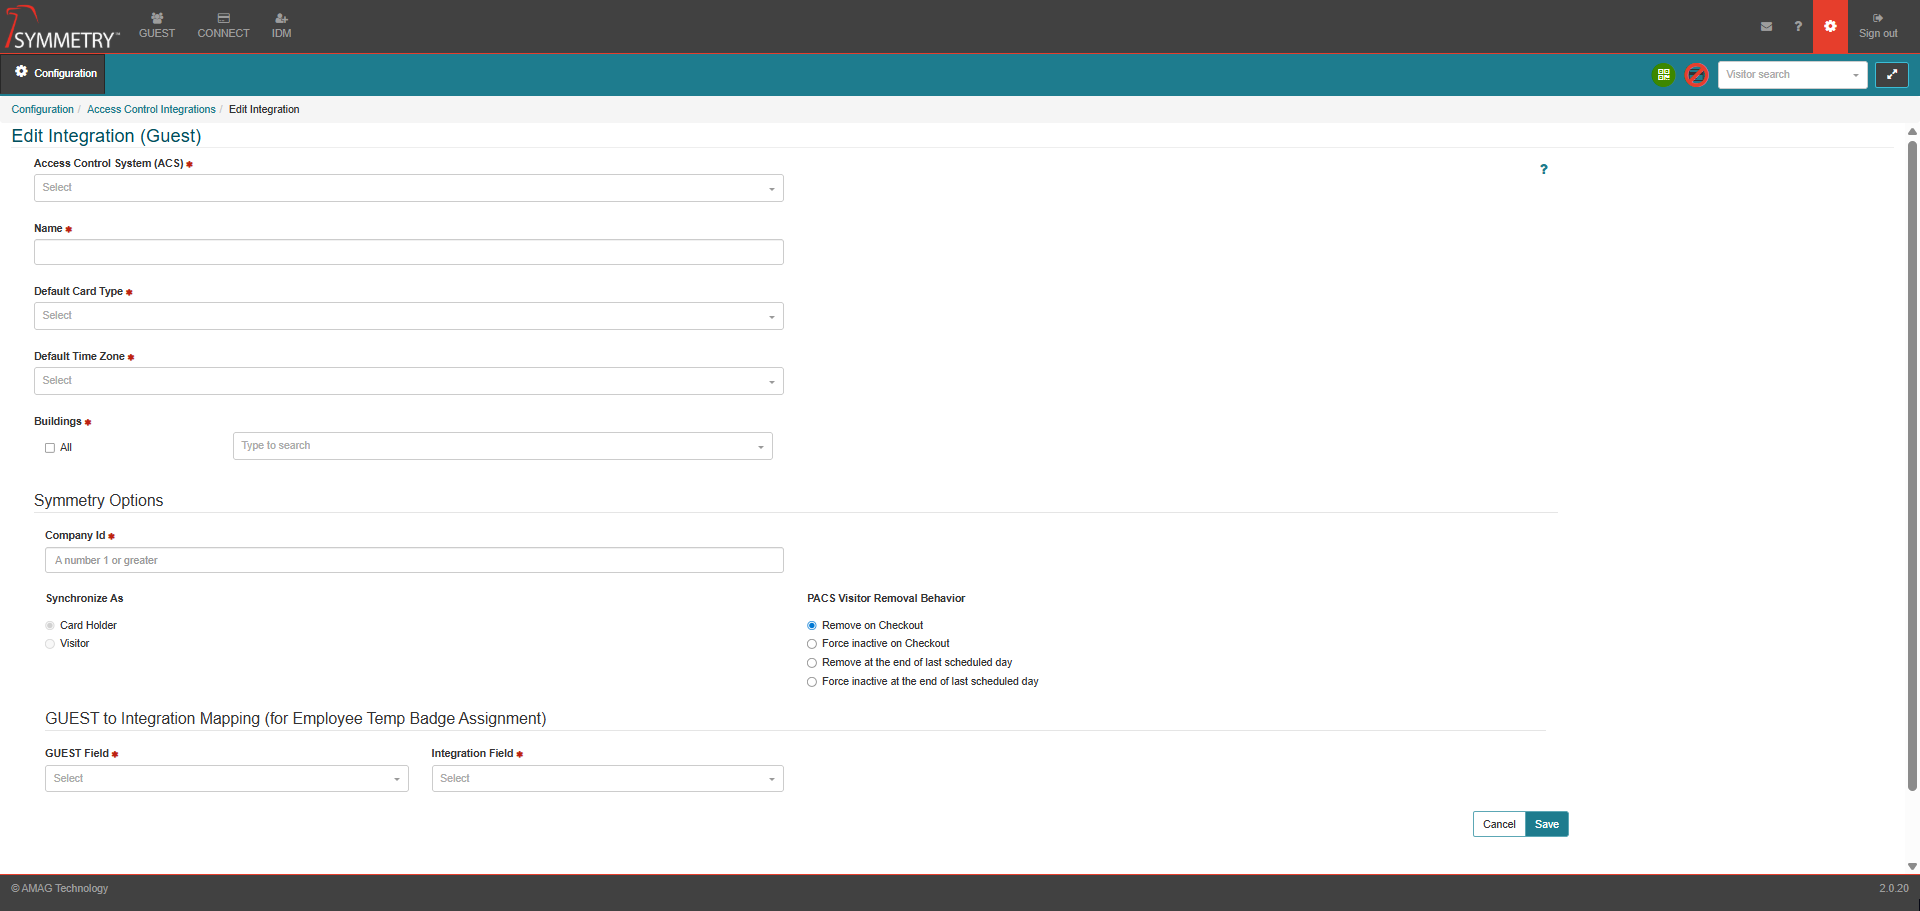
GUEST Configuration:
Log into Symmetry CONNECT/GUEST/IDM and navigate to Settings icon > Guest Settings > Access Control . If the configuration is being performed for CONNECT, see the section below. If the system uses both, then both need to be configured.
The user must provide a name for the integration, then define which building(s) this integration is associated with.
The user must enter the Company id. This is the Company in the Symmetry Access Control System that will be linked to this integration. Typically the Company id = 1.
The user must select the unique identifiers to use for mapping GUEST users with the identity in Symmetry. This mapping is used to issue a temporary credential to an existing employee record in Symmetry. Typically Employee Number in GUEST is mapped to the Employee Ref field in Symmetry to uniquely identify employees.
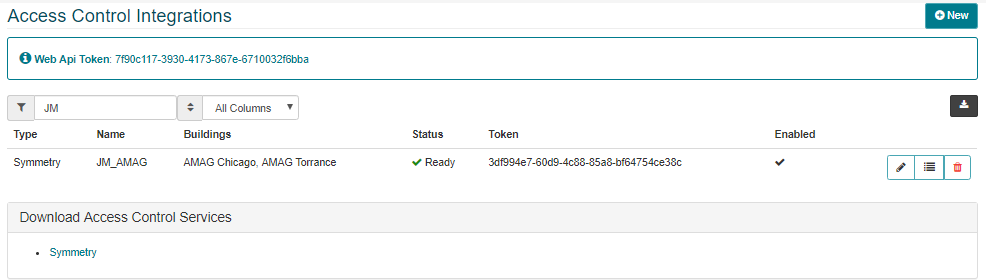
Once the Access Control Integration is saved, a new integration will appear. A new Integration Token is assigned and the status is now Waiting to Sync.
The next step is to proceed to the installation of the AMAG.Symmetry.Client service on the Symmetry system.
The image below shows the GUEST integration, Waiting to Sync. Once the integration service is installed and running, the status will change to “Ready”. At this stage, Credential and Access Rules can be configured. Please follow the section below title Installation of the AMAG Symmetry Client to install the integration service. Once this step is complete, please review the following section titled Credential and Access Rule Configuration.

Credential and Access Rule Configuration:
Once the integration has been installed and the integration status has changed to Ready, a new option is available to the user, allowing configuration of Access Cards (Credentials) and Access Code assignment to visitors.
Click on the new icon to manage Credential and Access rules.
Click New to create a new rule, or edit any existing rules that may have been created previously.

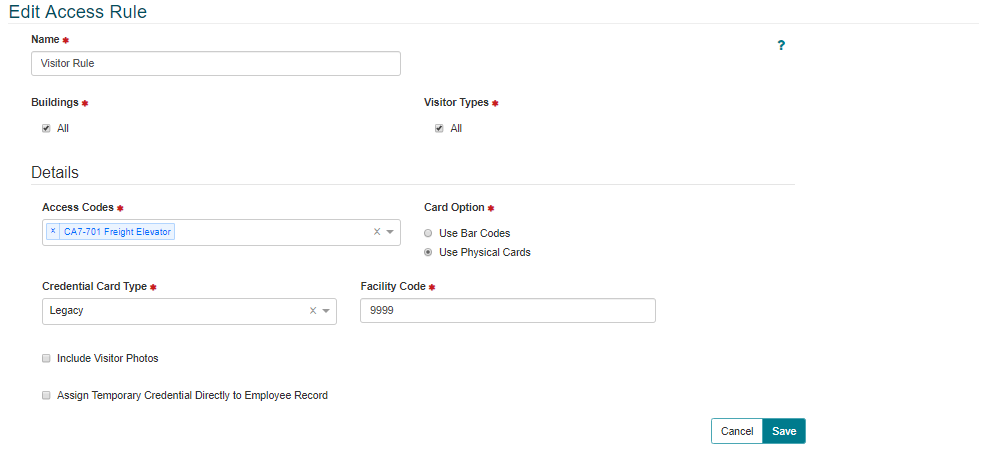
Enter a Name for the Rule.
Select which Buildings and Visitor Types to which the rule apples. Any visits scheduled with one of these Buildings and Visitor Type combinations will result in the configured credentials and access rights being assigned to the visitor.
Select the desired Access Code(s) to be assigned.
Select the desired Card Option (barcode or access card). Enter the subsequent card type and facility code details as applicable.
Check the box to include Visitor Photos if the visitor photo should be pushed down into Symmetry Access Control when the visitor is added.
Check the box to assign a temporary credential to the employee record in Symmetry if applicable. This will allow GUEST to locate the existing employee record and assign them a temporary credential, rather than adding a completely new visitor record into Symmetry Access Control.
Click Save once all configuration is complete.
CONNECT Configuration
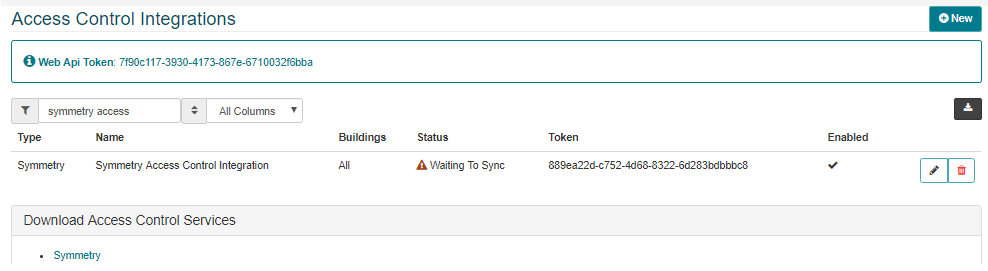
The image below shows a basic access control integration for CONNECT.
The user must provide a name for the integration.
The user must enter the Company id. This is the Company in the Symmetry Access Control System that will be linked to this integration. Typically the Company id = 1.
The user must configure a unique identifier to link Identities in Symmetry Access Control, with the Identity record in CONNECT. Typically Employee Number in CONNECT is mapped to EmployeeRef in Symmetry.
The user can (optional) also map fields from the Identity record on the IDM tab of CONNECT to Personal Data Fields in Symmetry Access Control. This is useful where additional data needs to be pushed and stored in Symmetry.
The user must click “Save” once all configuration is complete.

Installation of the AMAG Symmetry Client
Download the AMAG.Symmetry.Client by downloading the latest version using the link in Configuration>Access Control>Download Access Control Services (from GUEST or CONNECT).
Once downloaded, “double-click” on the AMAG.Symmetry.Client install to start the process.
During the install, you will be prompted to enter some configuration settings. It is best practice to copy and paste from Configuration Access Control Access Control Integrations.
Symmetry CONNECT URL: This is the URL, note the subdomain should be different for each client
Web API Token: Token found in CONNECTConfigurationAccess Control Access Control Integrations
Messaging Backend: (Azure/RabbidMQ): Azure for Hosted, RabbidMQ for on Premise (typically Azure)
Data Flow Mode: (Default/Downstream/Upstream): Leave as “Default” unless there is no connectivity between Symmetry Access Control and CONNECT/GUEST
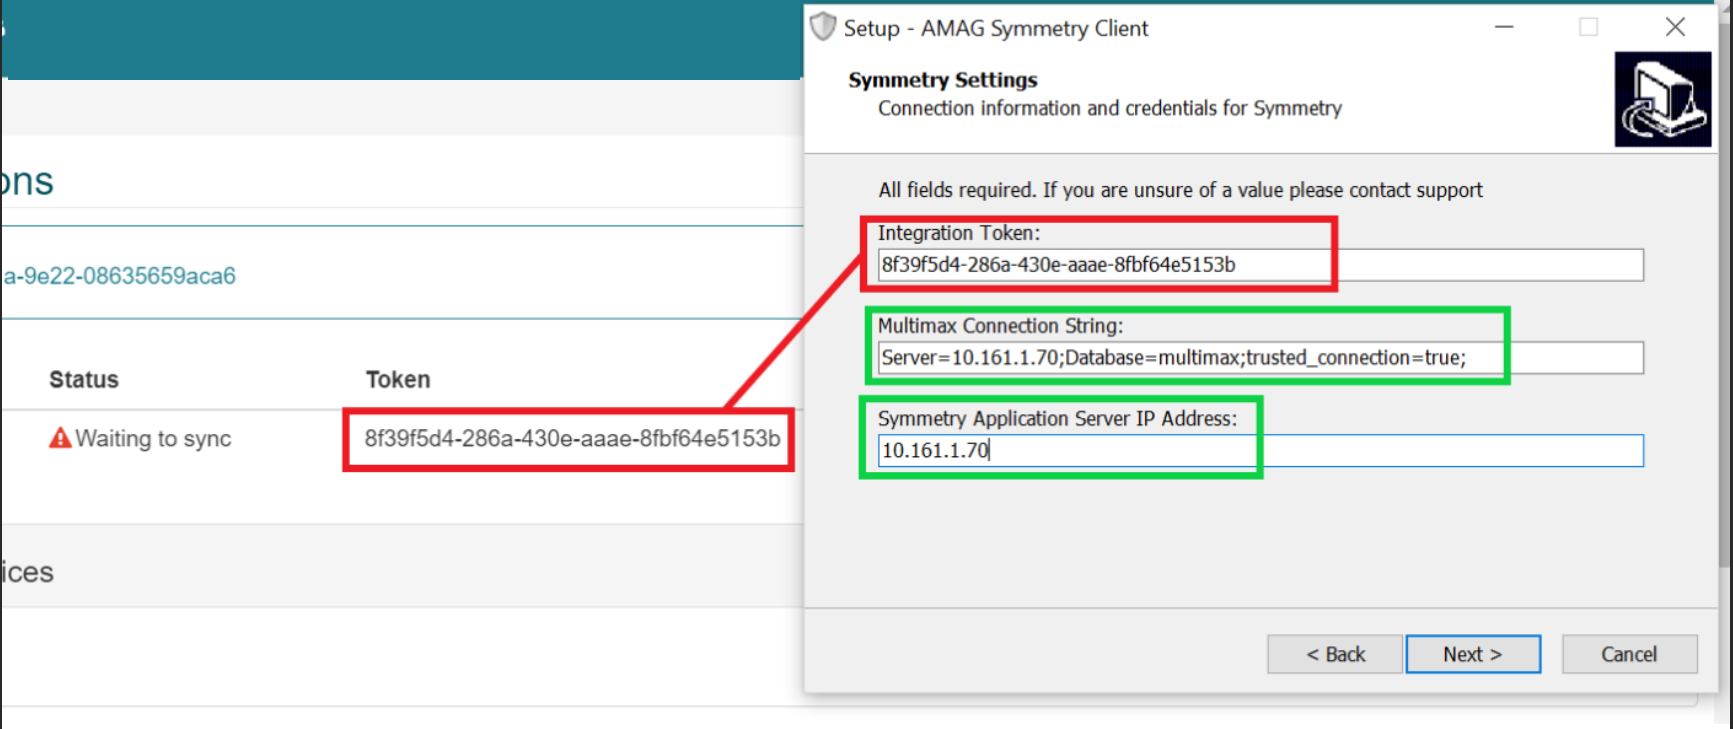
During the install, you will be prompted to enter some configuration settings. It is best practice to copy and paste from Configuration Access Control Access Control Integrations (continued).
Symmetry CONNECT URL: This is the URL, note the subdomain should be different for each client.
Multimax Connection String: This is the connection settings for access to the Symmetry database. Server=[enter ip address of DB server];Database=multimax;trusted_connection=true;
Server: This is the Symmetry Application Server IP address or Name.
Database: This is the Multimax DB name.
Trusted_Connection = true: This is set if you are logged in and installing with the service ID that will run this service and it has all permissions needed to access the database. If not using the Trusted_Connection option, then follow the below sample for entering the SQL user and pw.
Multimax Connection String: Server=10.161.1.70;Database=multimax;User Id=xxxx;Password=xxxxxx
Symmetry Application Server IP Address: This is the Symmetry Application Server IP address.
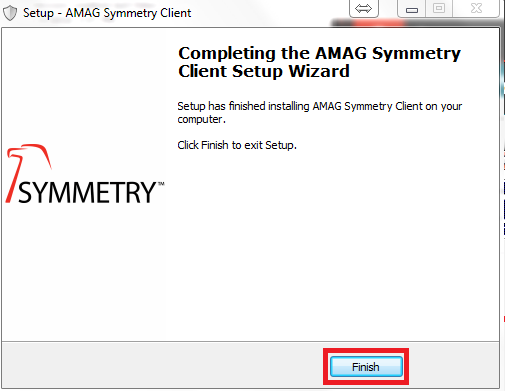
Click on Finish to complete the install
Editing the Integration Settings Post-Installation:
To change any of the settings once the utility has been installed, follow these steps:
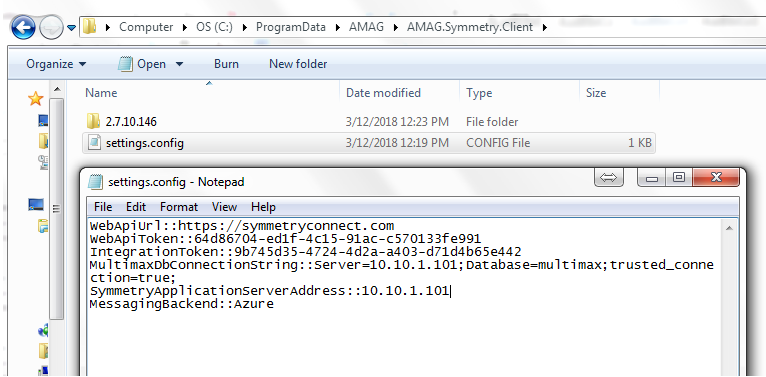
The service is installed in C:\\ProgramData\AMAG\Amag.Symmetry.Client\X.X.X.X. In the root directory, you will find a settings.config file.
The setting.config file contains 6 configuration settings:
WebApiUrl: phone home url – going over https (443)
WebApiToken: This is similar to login credentials to login into our WebApi
IntegrationToken: This links the GUEST/CONNECT configurations to the Symmetry system
MultimaxDbCONNECTionString: CONNECTion String to the multimax database (Symmetry)
SymmetryApplicationServerAddress: This is the IP Address of the Symmetry Application Server (can be the same as the database server)
MessagingBackend: Azure when Hosted OR RabbitMQ when On-Premise
Running the Integration Service:
Tip
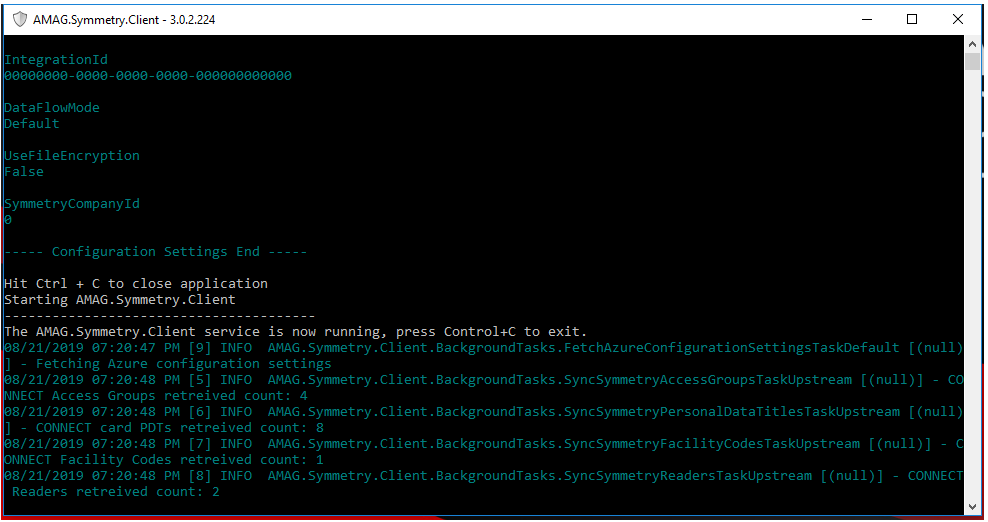
It is recommended to start with testing the AMAG.Symmetry.Client in Console Mode.
The next step is to start the AMAG.Symmetry.Client service. This will change the integration status to “Ready” and a new button will now appear to allow for configuring the rules when a visitor is checked in.
Follow these steps to run the service in console mode:
Make sure the AMAG.Symmetry.Client service is not running as a service.

Note
Program Data is a hidden folder by default, so you will need to change the view in order to locate this folder.
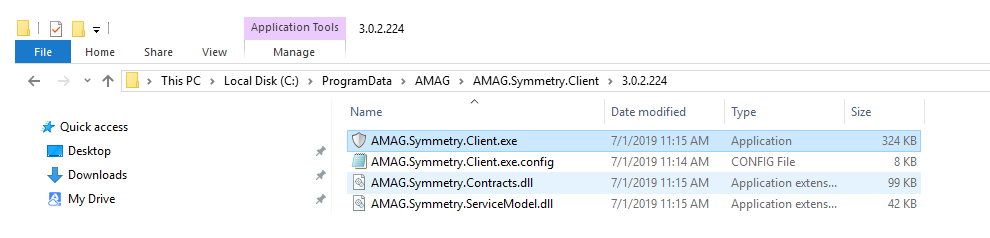
Using File Explorer, navigate to C:\ProgramData\AMAG\AMAG.Symmetry.Client\3.0.2.224 (or the folder with the highest version number) and run the AMAG.Symmetry.Client exe.
Note
Errors will typically show up in red in the console.
Validate the service is running without errors and that at least the test Access Group created within Symmetry (Prior to) has sync’d up to CONNECT (if CONNECT is in scope). After testing has been validated, make sure cancel the service in Console mode and then start it in normal service mode.
Once the integration service is running, the Status in CONNECT/GUEST will appear as Ready.
GUEST Integrations will now allow the user to set up Credential and Access Rules.
Communication
The service communicates to the URL defined in the WebApiUrl when uploading GUEST/CONNECT with Symmetry hardware and access codes. All traffic goes over https (443).
Hosted Solutions Only: The service also communicates with Microsoft Azure Service Bus to retrieve GUEST/CONNECT messages. The messages are then actioned in Symmetry. The URL used for Microsoft Azure Service Bus: https://servicebus.windows.net/ All traffic goes over https (port 443, the firewall must allow the use of outbound port 443).
On-Premise Solutions Only: The service also communicates with RabbitMQ (Port 5672) to retrieve GUEST/CONNECT messages. The messages are then actioned in Symmetry.