Guide to Symmetry API Automation
A guide to setting up CONNECT authorisation using the Postman API tool.
Getting the Tools
Before any communication is sent to the API, a tool is required that acts as the "phone." The Postman API tool is the recommended tool to use. This tool must be downloaded.
Download Postman:
Navigate to Download Postman
Download and install the free version applicable to your operating system.
Note
A paid account is not required; the free version offers all functionalities required for this use case.
Setting Up Your "Keys" (Environment)
A Plaintext Password should never be embedded directly into source code. Instead, Environment Variables should be used. This provides a secure and isolated mechanism for managing sensitive configuration data.
The following steps describe the process for setting up the Environmental Variables.
Note
All steps in this section are completed using the Postman Tool.
Open the downloaded Postman tool.
Click on the Environments button located on the left-hand sidebar.
Click the Add (+) button to create a new Environment Variable.
Name the new environment "Symmetry API".
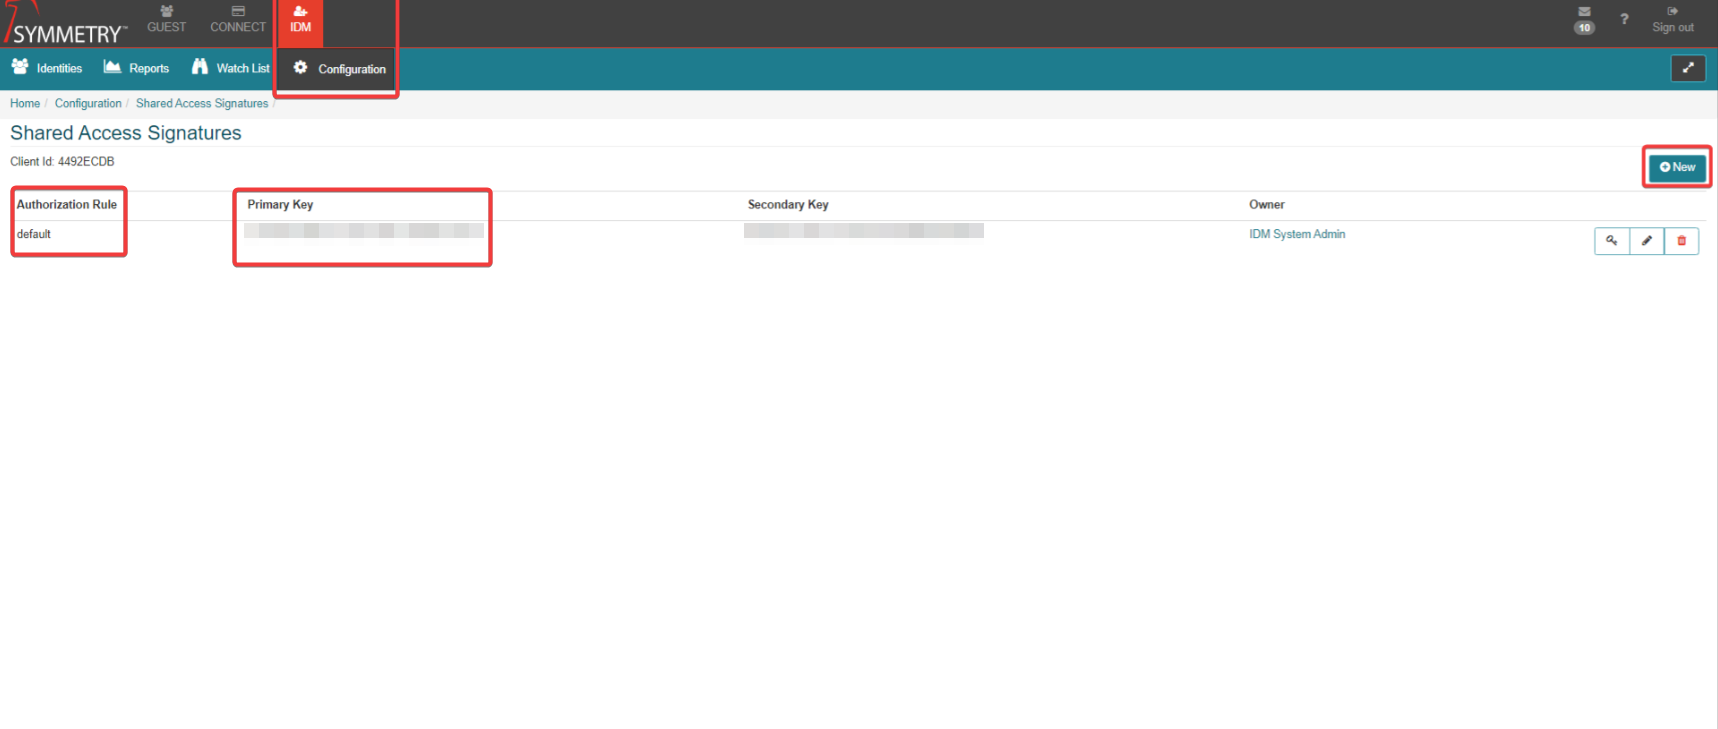
Add the following 4 variables.
Note
The variables are Case Sensitive.
Figure 1, as referenced in the information table above.
Click the Save button located at the top right of the screen.
Activate the Environment: Navigate to the top right corner of the Postman screen. Select the drop-down menu (this usually says "No Environment"). Select and click on the "Symmetry API" environment.
The Automation Script
There is a requirement for a Script that runs before every request to generate a temporary "entry pass" (SAS Token) using the user's secret keys.
Navigate to the API Request (for example, "Create Identity")
Click on the Pre-Request Script tab.
Delete Everything that is currently displayed (if applicable).
Paste the following code exactly.
The Script (With Explanations)
// --- SYMMETRY API AUTHENTICATION SCRIPT --- // This script runs automatically before your request is sent. // It generates a secure "Shared Access Signature" (SAS) token. { // 1. GET VARIABLES // We pull the secrets from the "Environment" backpack we set up earlier. const clientId = pm.environment.get("ClientId"); const url = pm.environment.get("ResourceURI"); const secretKey = pm.environment.get("Token").toUpperCase(); // Must be Uppercase! const authorizationRule = pm.environment.get("AuthorizationRule"); // 2. SET EXPIRY TIME // We get the current time (now) and add 500 days to it. // This tells the server: "This token is valid for the next 500 days." const now = Math.floor(new Date().getTime() / 1000); const tokenExpiry = now + (500 * 24 * 60 * 60); // 3. CREATE THE "STRING TO SIGN" // This is a specific text format the server expects us to sign. // It combines the URL and the Expiry time. const stringToSign = encodeURIComponent(url) + "\n" + tokenExpiry; // 4. GENERATE THE SIGNATURE // We use cryptography (HMAC SHA256) to "sign" the string using your Secret Key. // This proves to the server that YOU created this request, without revealing your key. const hash = CryptoJS.HmacSHA256(stringToSign, secretKey); // Convert the math result into a readable string (Base64) const signature = encodeURIComponent(CryptoJS.enc.Base64.stringify(hash)); // 5. ASSEMBLE THE FINAL TOKEN // We glue all the pieces together into the final "SharedAccessSignature ..." string. const sasToken = "SharedAccessSignature cid=" + clientId + "&sig=" + signature + "&se=" + tokenExpiry + "&skn=" + authorizationRule + "&sr=" + encodeURIComponent(url); // 6. SAVE TO POSTMAN // We save this final string into a variable called {{sasToken}}. // You can now use {{sasToken}} in your Headers. pm.environment.set("sasToken", sasToken); console.log("Success: SAS Token generated."); } catch (error) { console.error("Error generating SAS token:", error); } 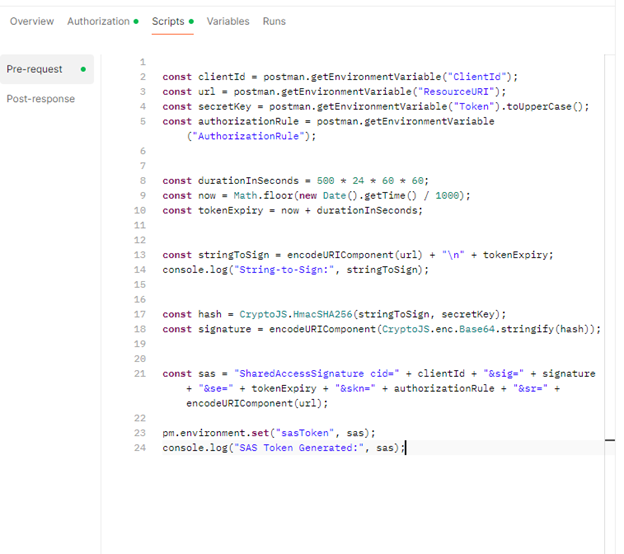
Linking the Script to the Request
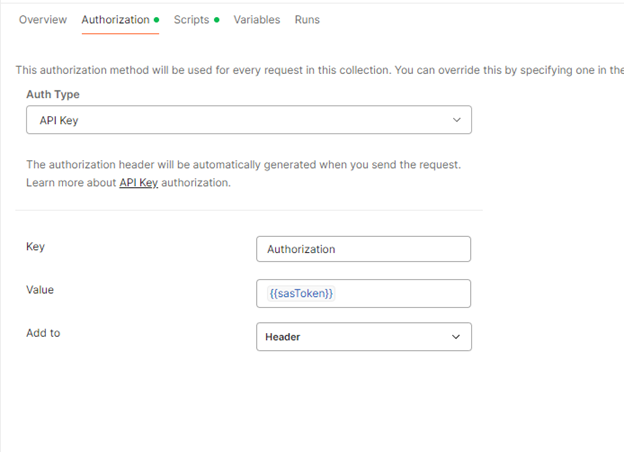
Navigate to the Authorization tab of the request.
Type: API Key
Key: Authorization
Value: {{sasToken}} (This tells Postman to grab the result from the script above).
Add to: Header