Access Control Integrations
Warning
It is advised that the user of this installation guide already has a fundamental understanding of the Symmetry System and the GUEST Configuration system before attempting to configure this section.
Note
Required fields are indicated with a red Asterisk.
Note
Access to the Access Control Integrations section can be toggled between On or Off.

Integration with the Symmetry SMS Access Control System is configured within the Access Control sub-section. Integration with Symmetry SMS provides the following functionality:
Access Rights (known as Access Codes in Symmetry SMS) are imported from Symmetry SMS into GUEST
The Access Rights are pre-configured by an Administrator in GUEST according to specific visit types and locations (for example, if a visitor is a contractor and they are checking into the Company HQ location, they will be assigned the specific access rights for that area).
A visitor can be issued an access card during check-in. GUEST will push the visitor into the Symmetry Access Control System, along with the access card and access rights assigned.
As an alternative to issuing an access card, a barcode can be printed onto the visitor badge. GUEST will push the visitor record and their barcode number into the Symmetry Access Control System, along with the relevant access rights. This provides the visitor with access without having to issue them a (potentially cost-incurring) access card that may not be returned at check-out.
An employee that forgets their access card can be issued a temporary access card. This card can be assigned directly to the employee’s existing record in Symmetry SMS and the permanent card is disabled. This ensures that the employee keeps their existing access rights, and that they only have a single active access card assigned to them. The temporary card is removed at check-out and the employee’s permanent card is re-instated automatically.
GUEST reporting includes the ability to show where each visitor presented their access card/barcode in the Symmetry Access Control System.
Creating a New Access Control Integration
Note
Complete instructions for installing and configuring the Integration utility are provided separately in the Symmetry Client installation guide. Please Contact the AMAG technical services for assistance if required.
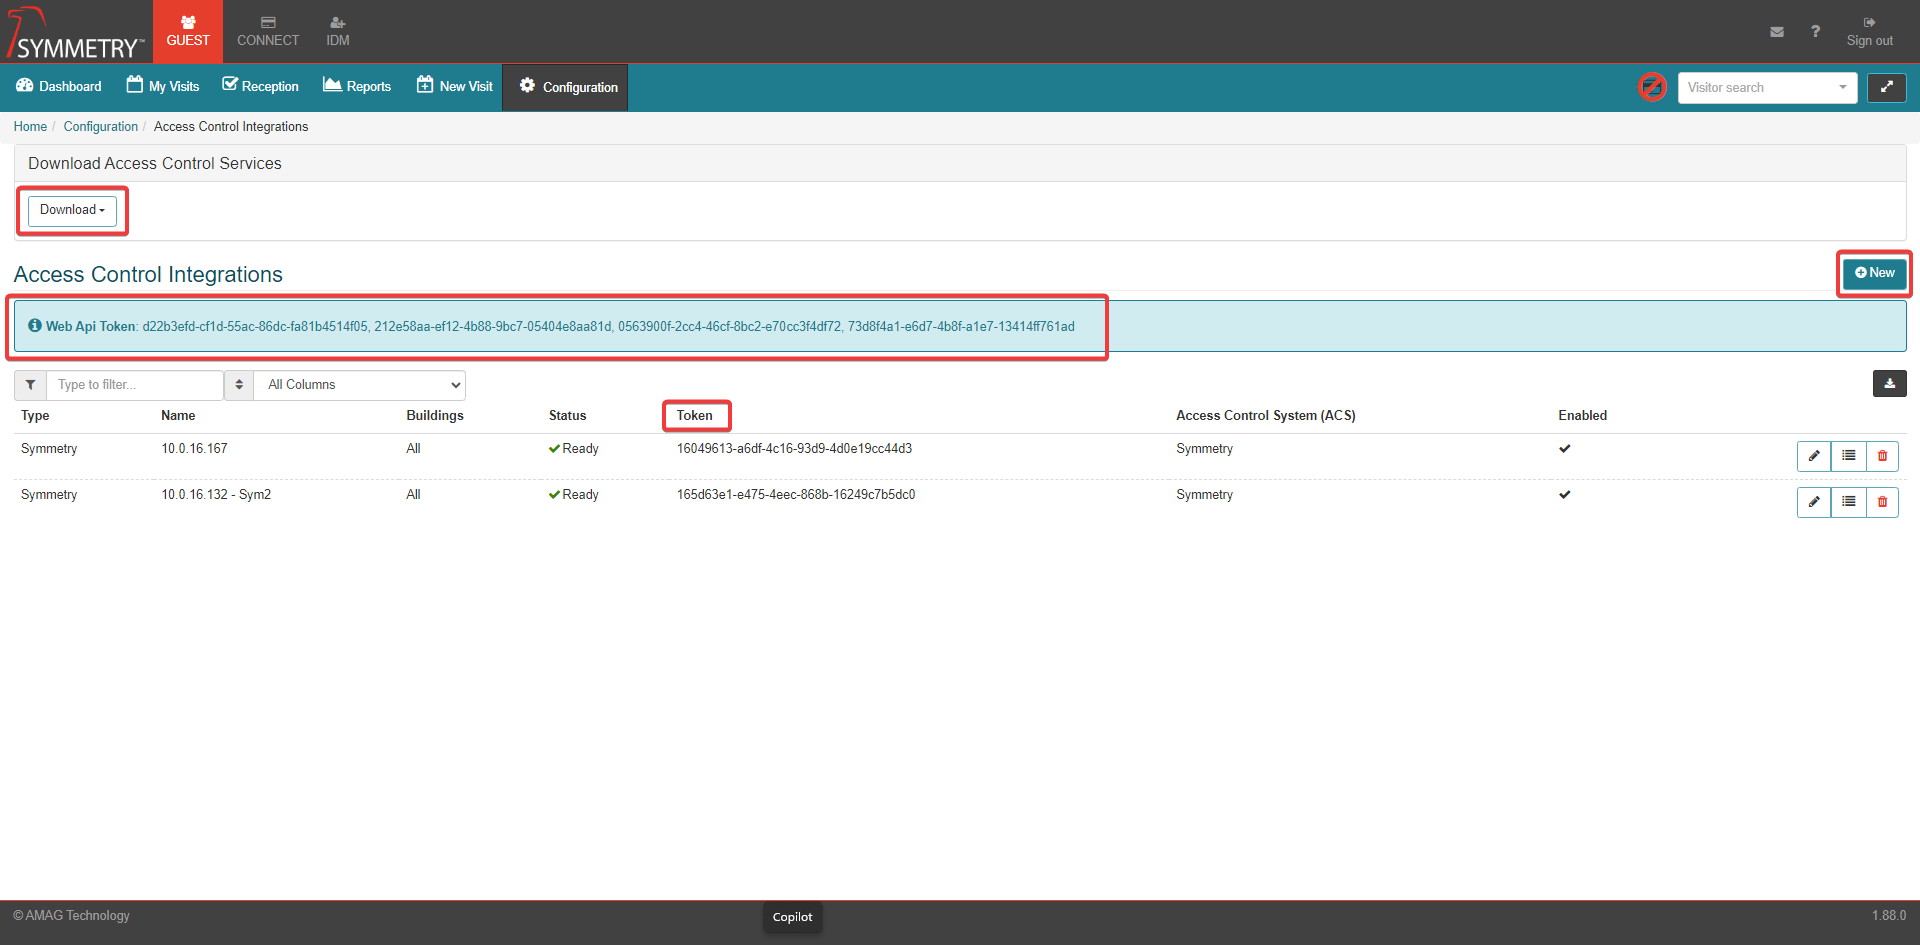
An administrator is able to create and configure a new Integration by clicking the New button.
The Web API Token is available on the screen. This is required when installing the integration utility.
The Integration Token is available on the screen (in the column labelled Token). This is required when installing the integration utility.
The Symmetry SMS integration utility is available for download on this screen via the Download button in the Download Access Control Services section. Once downloaded it can be installed locally to facilitate integration with the access control system.
When the user clicks New, they will need to enter the details about the integration per the screen in the next step.
On this screen the user is required to provide the following information:
Access Control System (ACS): The type of access control system used in the integration, e.g. Symmetry.
Name: A unique name for the integration, used only for display purposes.
Default Card Type: The card type that will be used when adding a placeholder card to Symmetry. Must match a card type available in Symmetry Access Control.
Buildings: Defines which buildings the integration will encompass. The user can select all Buildings at this stage by ticking the All checkbox.
Company Id: The company identification number for the company that CONNECT will sync identities with.
Synchronize As: Defines how visitor records should be synchronized down to Symmetry. Options include:
Card Holder: GUEST Visitors will be synced to Symmetry as Card Holders.
Visitor: GUEST Visitors will be synced to Symmetry as Visitors.
PACS Visitor Removal Behavior: Defines what happens to visitor records in Symmetry after the visit has ended. Options include:
Remove on Checkout: Will fully remove the identity from the access control system when checked out.
Force inactive on Checkout: Will mark the identity as inactive in the access control system when checked out.
Remove at the end of last scheduled day: Will fully remove the identity from the access control system at the end of the day on the scheduled checkout day.
Force inactive at the end of last scheduled day: Will mark the identity as inactive in the access control system at the end of the day on the scheduled checkout day.
GUEST to Integration Mapping (for Employee Temp Badge Assignment): How identities will be looked up in the Symmetry Access Control system for Employee Temp Badge Assignment. Default GUEST fields are Employee Number and Email. Once corresponding fields have been created in the Symmetry integration and synced down to GUEST, user will be able to fill in GUEST field(s) and Integration field(s) and click the Save button to complete the set up of the Integration.
User is not restricted to just Employee Number and Email. They can use any field including UDFs provided fields are present in both GUEST New Visit and Symmetry Integration.
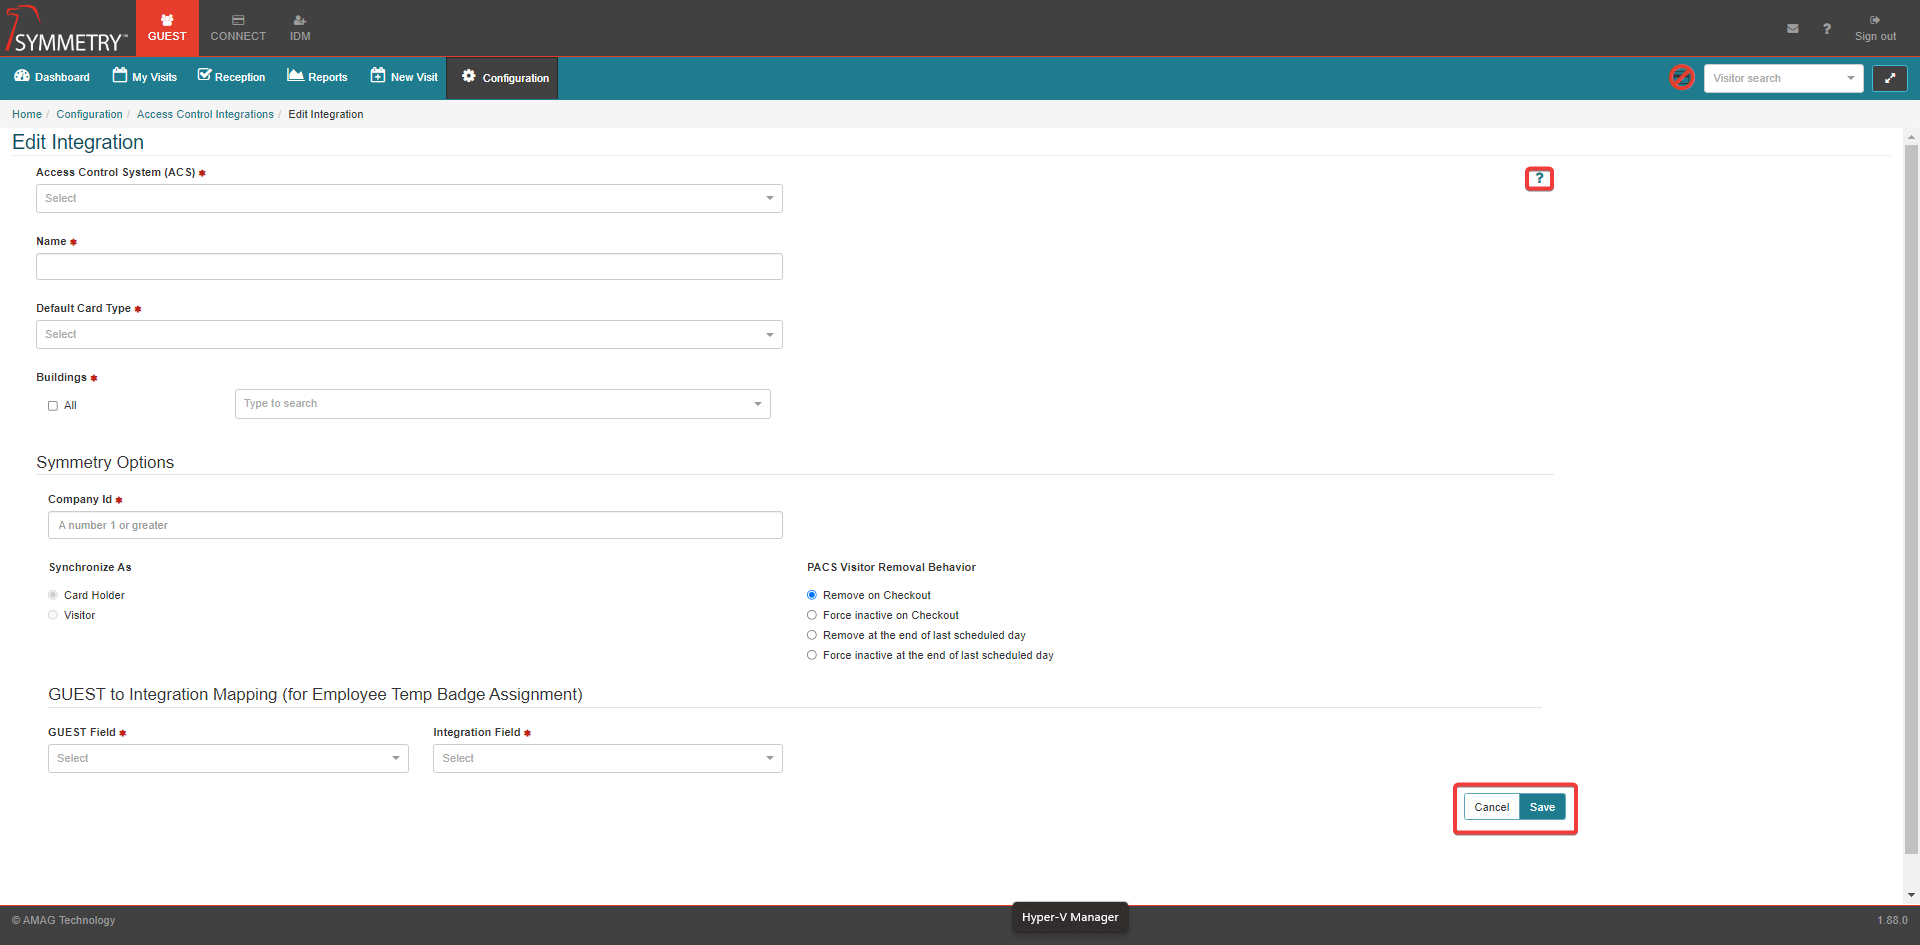
Clicking the Toggle Help icon will provide the user with a useful description of each field.
Click the Save button to create and save the Edit Integration. Or click the Cancel button to delete and cancel the new Access Control Integrations creation.
Once the integration is completely set up and the integration status changes to Ready, the user must configure the access and credential rules, in order to specify what access rights (and card type) are assigned to each type of visitor at each check-in location.

Click the Credential and Access Management button. This will automatically direct you to the Access Control Rules section.

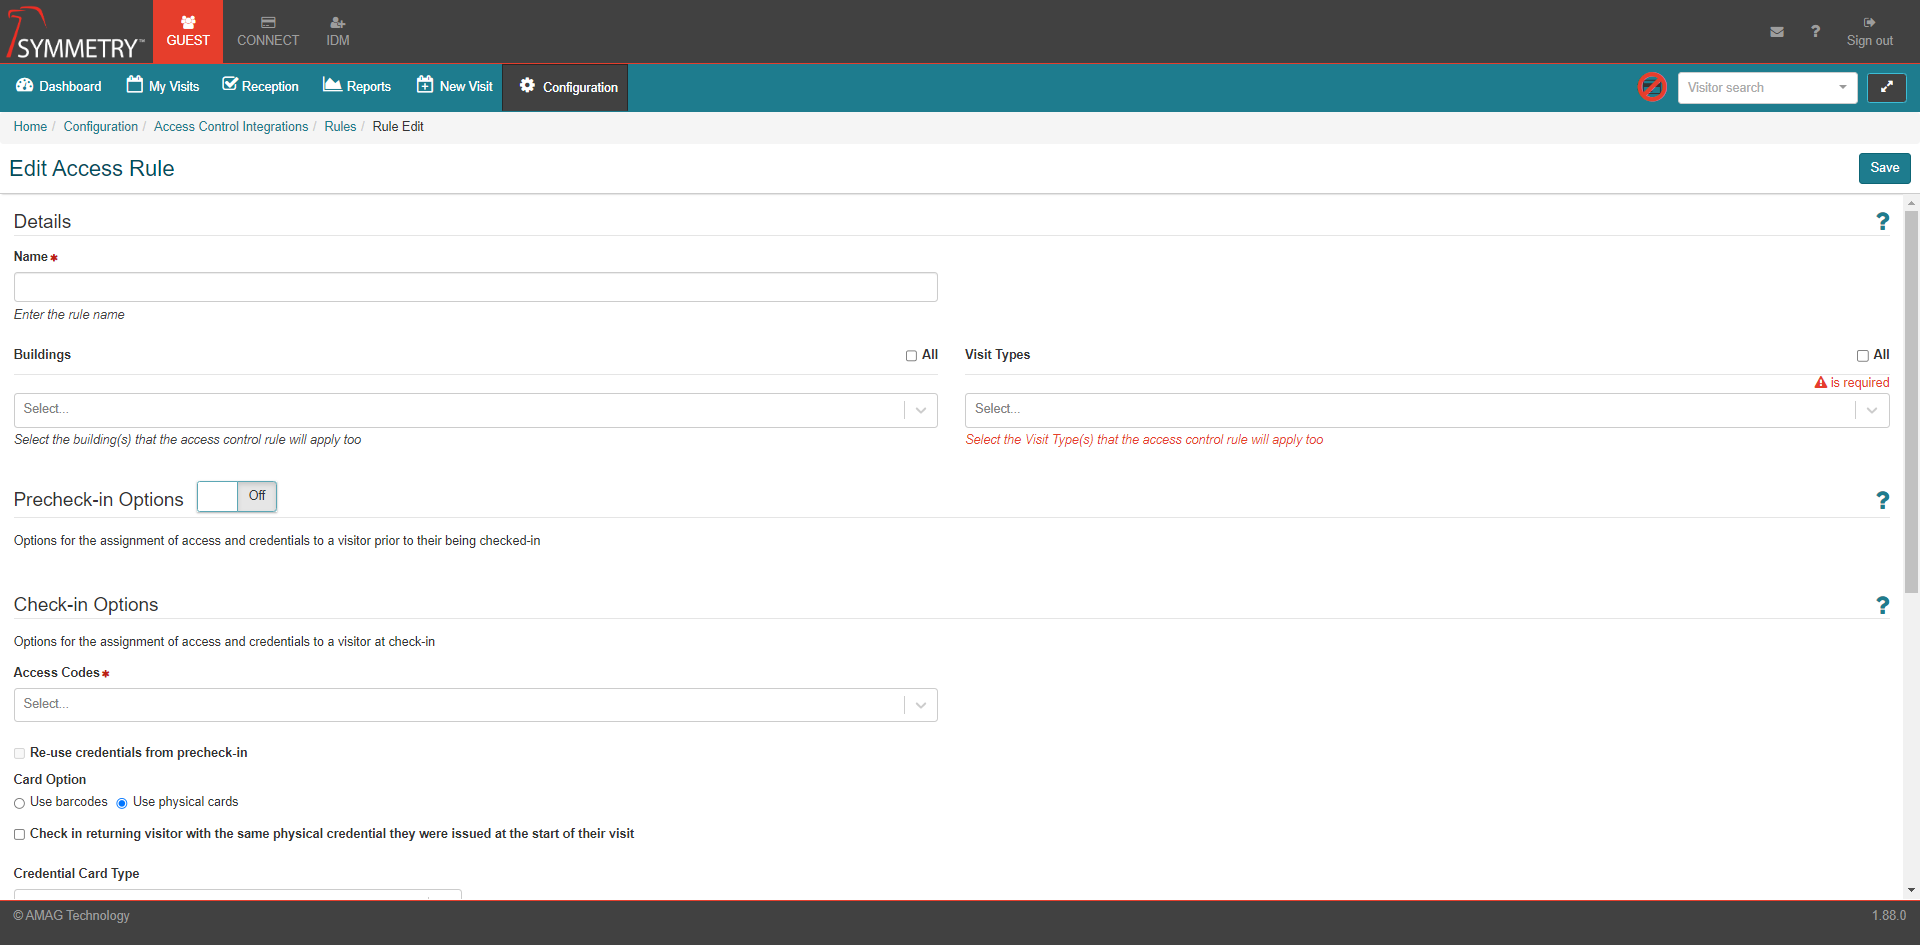
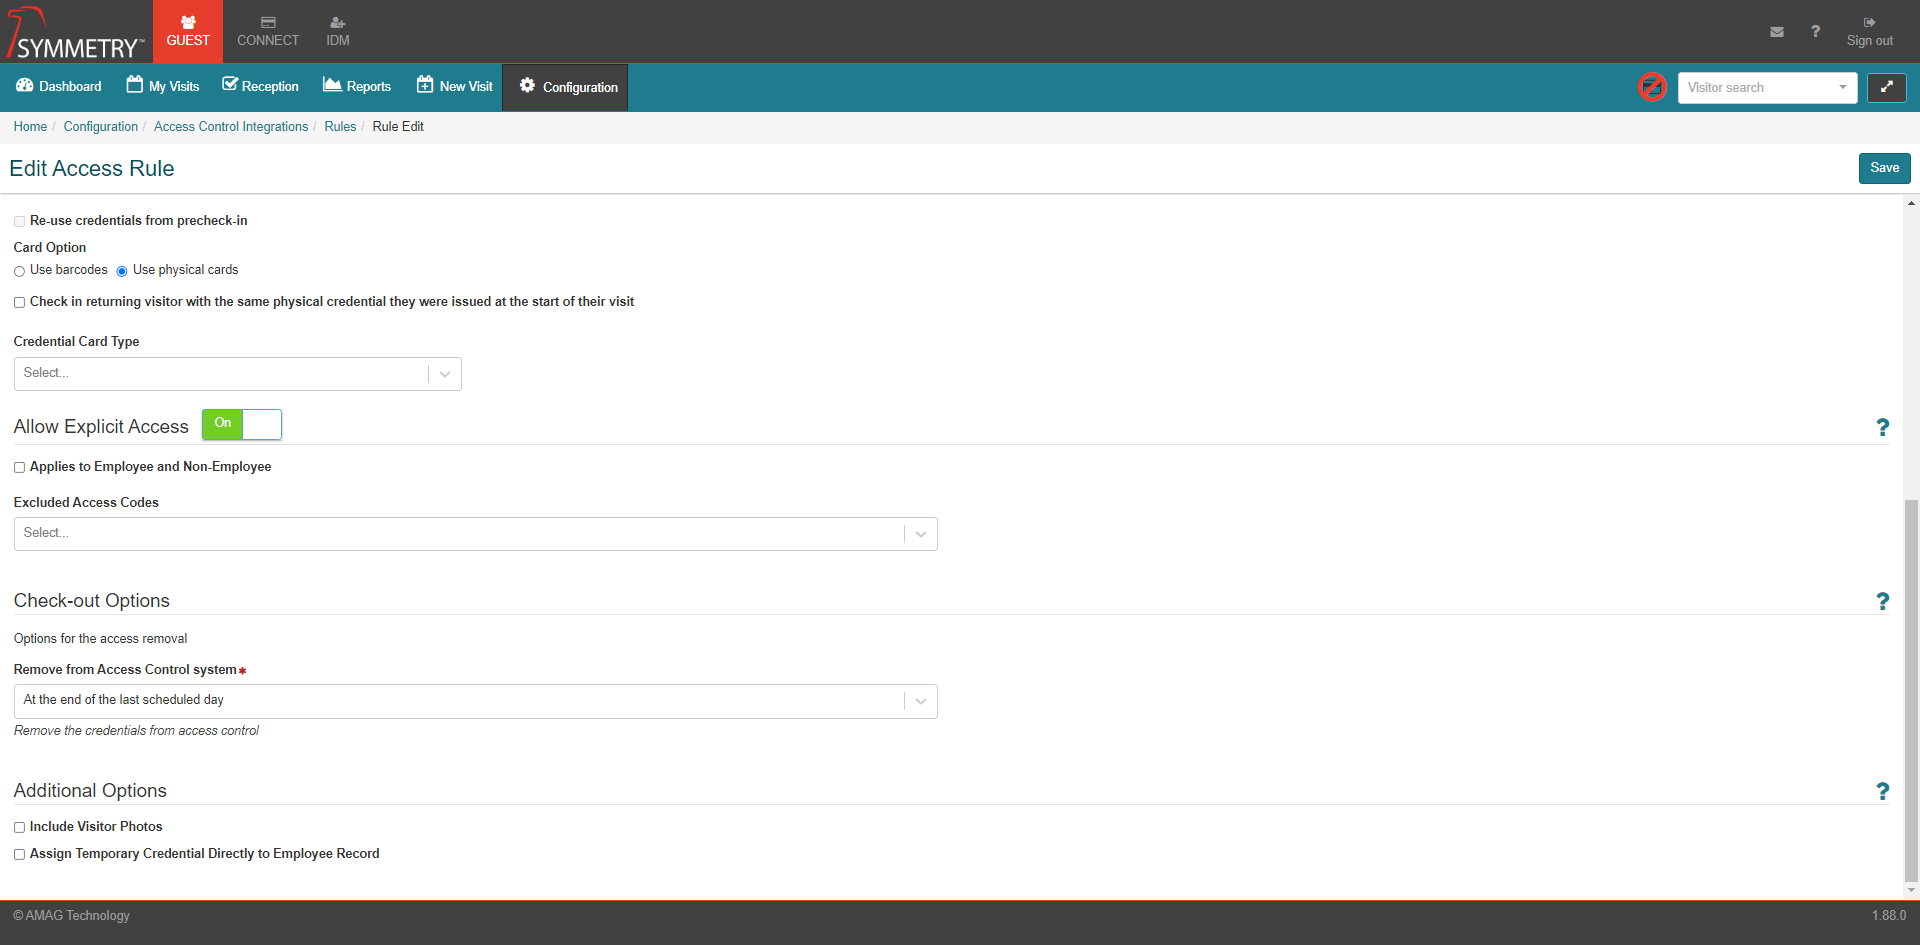
Click New On the Access Control Rules page to create a new rule. This will open the 'Edit Access Rule' page. Options are:

Name: Enter the rule name
Buildings: Select one or more buildings that the access control rule will apply to. User can tick the All option to select all Buildings.
Visit Type: Select one or more Visit Types that the access control rule will apply to. User can tick the All option to select all Visit Types.
PreCheck-in Options: Options for the assignment of access and credentials to a visitor prior to their being checked-in. If toggle ON, the following options become available:
Send to access control: Defines when the visitor and access will be sent to the access control system. Options include Immediately which will sync the visitor as soon as the visit is scheduled, or Days ahead which will allow the user to specify how many days before the visit to send the access.
Card Options: Automatically set to Use barcodes.
Credential Card Type: The type of card type to assign to the visitor in the access control system.
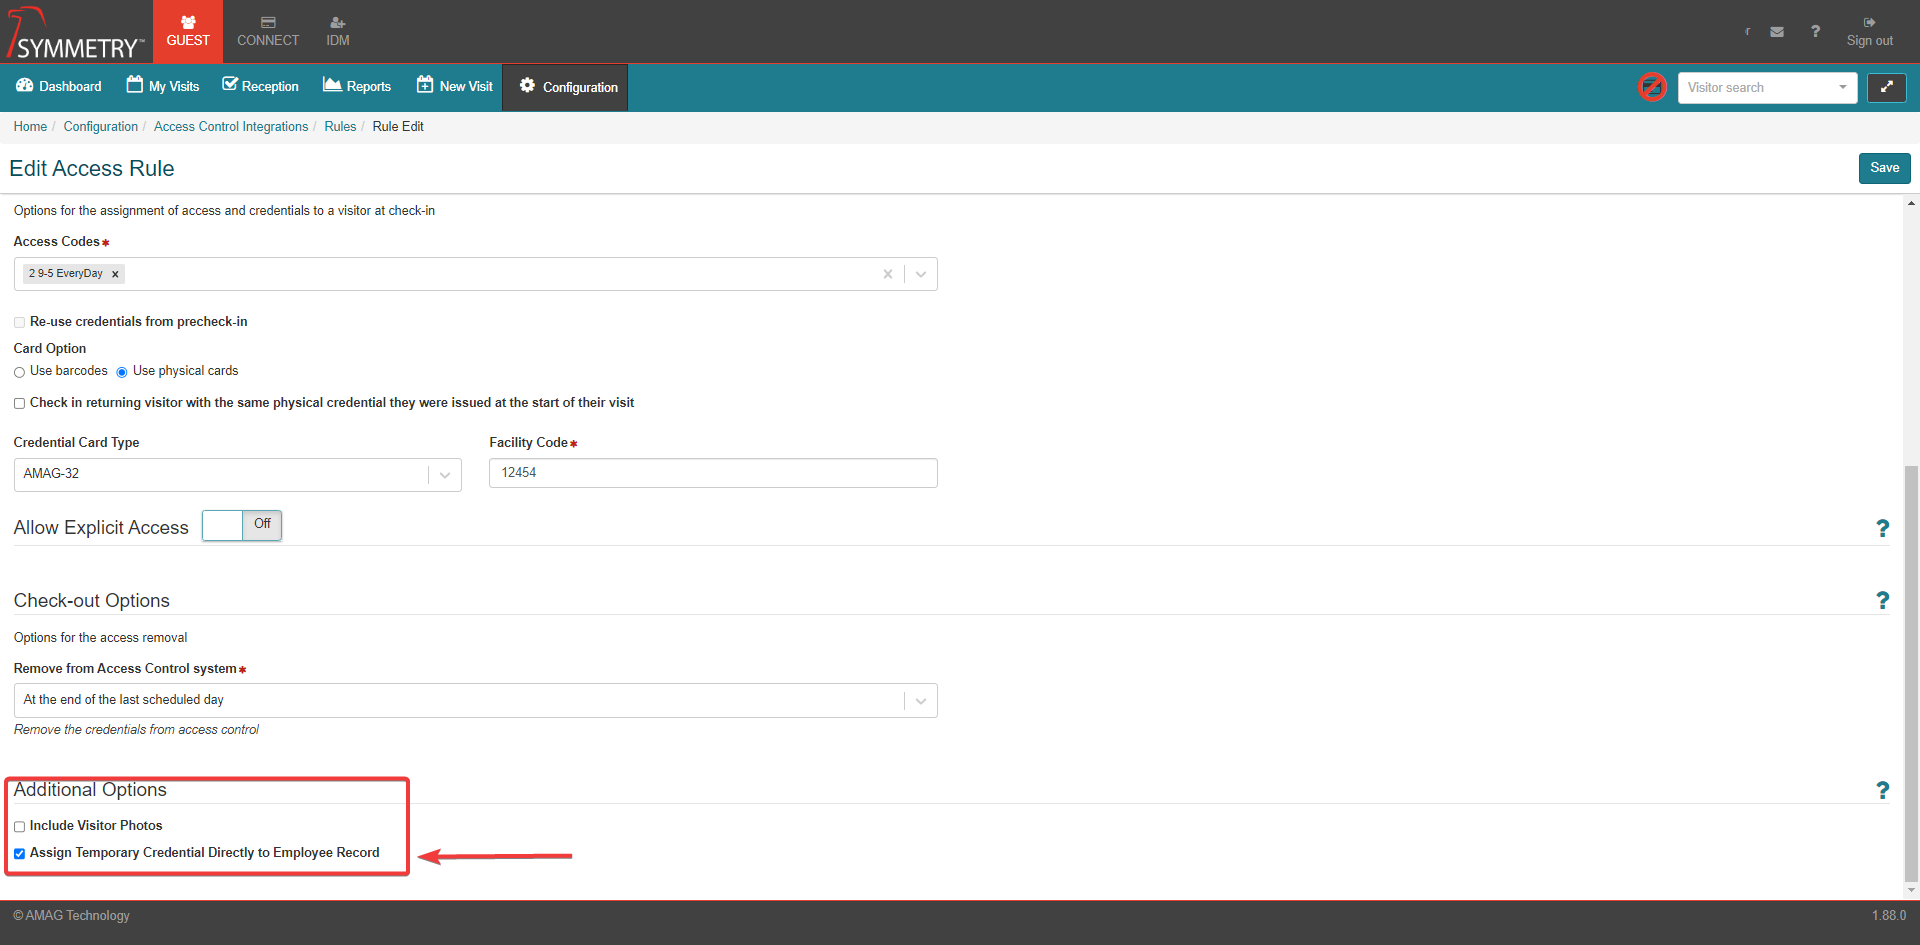
Access Codes: The user can select one or more access codes that will be assigned to the visitor.
Check-in Options - Access Codes: User can select one or more access codes that will be assigned to the visitor at Check-In.
Check-in Options - Re-use credentials from precheck-in: Whether or not to reuse at check-in the same credentials completed in the Precheck-in section.
Check-in Options - Card Option: The type of credentials that will be used at Check-In (Barcodes or physical cards). If Use physical cards selected, user has the option to Check in returning visitor with the same physical credential they were issued at the start of their visit. If ticked, system will reuse physical credentials when checking back in the visitor.
Check-in Options - Credential Card Type (and Facility Code, if applicable): The type of card type to assign to the visitor in the access control system at check-in. If Re-use credentials from precheck-in already ticked then this field will be disabled.
Check-in Options - Allow Explicit Access: If toggled ON, explicit access groups can be assigned to visitors at check-in. User also has the option to apply this functionality to Employee and Non-Employee and can also select one or more Access Codes that should be excluded / unable to be used for explicit access at check-in.
Remove from Access Control system: Defines when the credentials should be removed from access control. The options available are:
At Check-out
At the end of the last scheduled day
Include Visitor Photos: When enabled, visitor photos will be sent to the access control system.
Assign Temporary Credential Directly to Employee Record:When enabled, if the visitor is an identity, a temporary card will be associated with the cardholder record in the access control system.
Clicking the Toggle Help (?) icon will provide the user with a useful description of each field.
Click the Save button to create and save the Edit Access Rule.
Temporary Badge Issuance for Employees
GUEST includes a feature whereby employees may be issued a temporary access card/barcode in place of their permanent credential in the Symmetry access control system. When a temporary credential is issued for an employee, the system will look for the employee record in Symmetry and assign a temporary credential directly to their Cardholder record in Symmetry.
Note
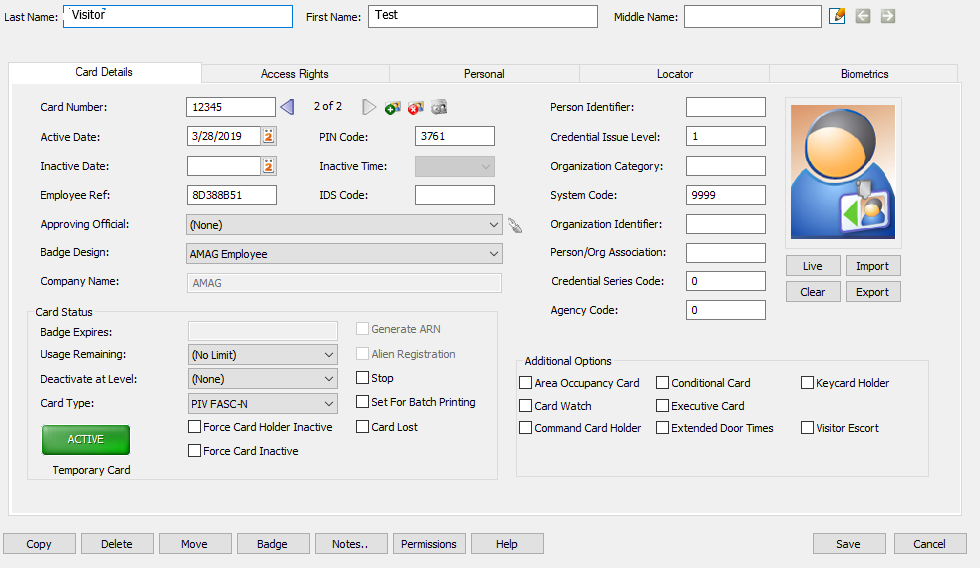
The Employee Number in GUEST (IDM tab) must match the Employee Ref field in the Symmetry Access Control system. If GUEST does not locate the employee record, GUEST will add a separate Cardholder record in Symmetry Access Control with standard “visitor” access.
In order to configure temporary badge issuance for Employees, first create an Access rule and select the check box entitled Assign Temporary Credential Directly to Employee Record. It is recommended that a Visitor Type of Employee be selected for this rule.
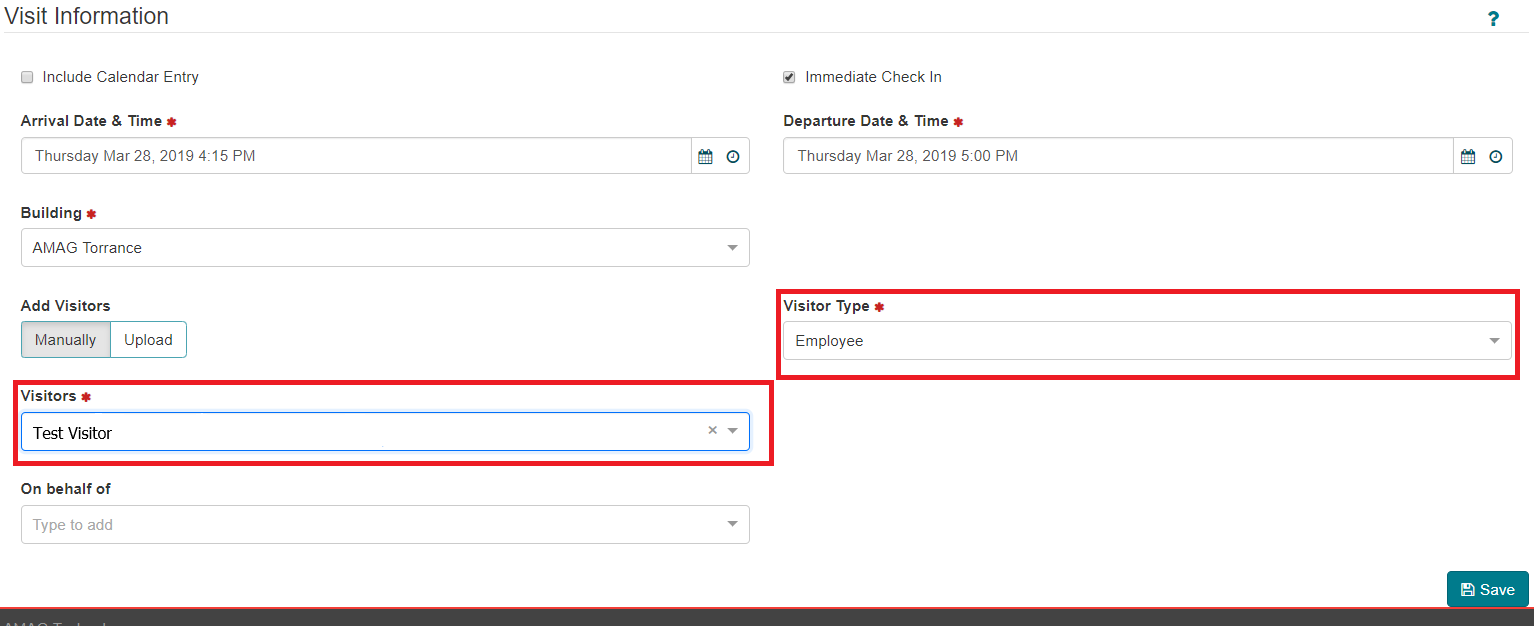
The Reception User will register the employee for their Visit. The Visitor Type selected is Employee and the existing employee record is selected as the visitor.
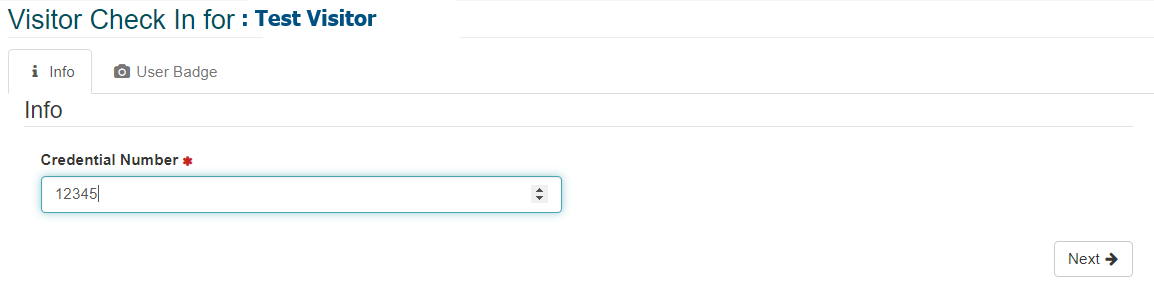
Assign the credential during check-in.
Once the employee has been checked in. The GUEST system will attempt to locate the employee’s record in Symmetry and assign a temporary credential. The employee retains their normal access rights and their permanent credential is disabled until they check-out, the temporary credential is then removed automatically.