Identities
Note
This is the process for managing Employees and Non-Employees in the system. To manage Visitors, refer to Visitors section in IDM Account Set Up.
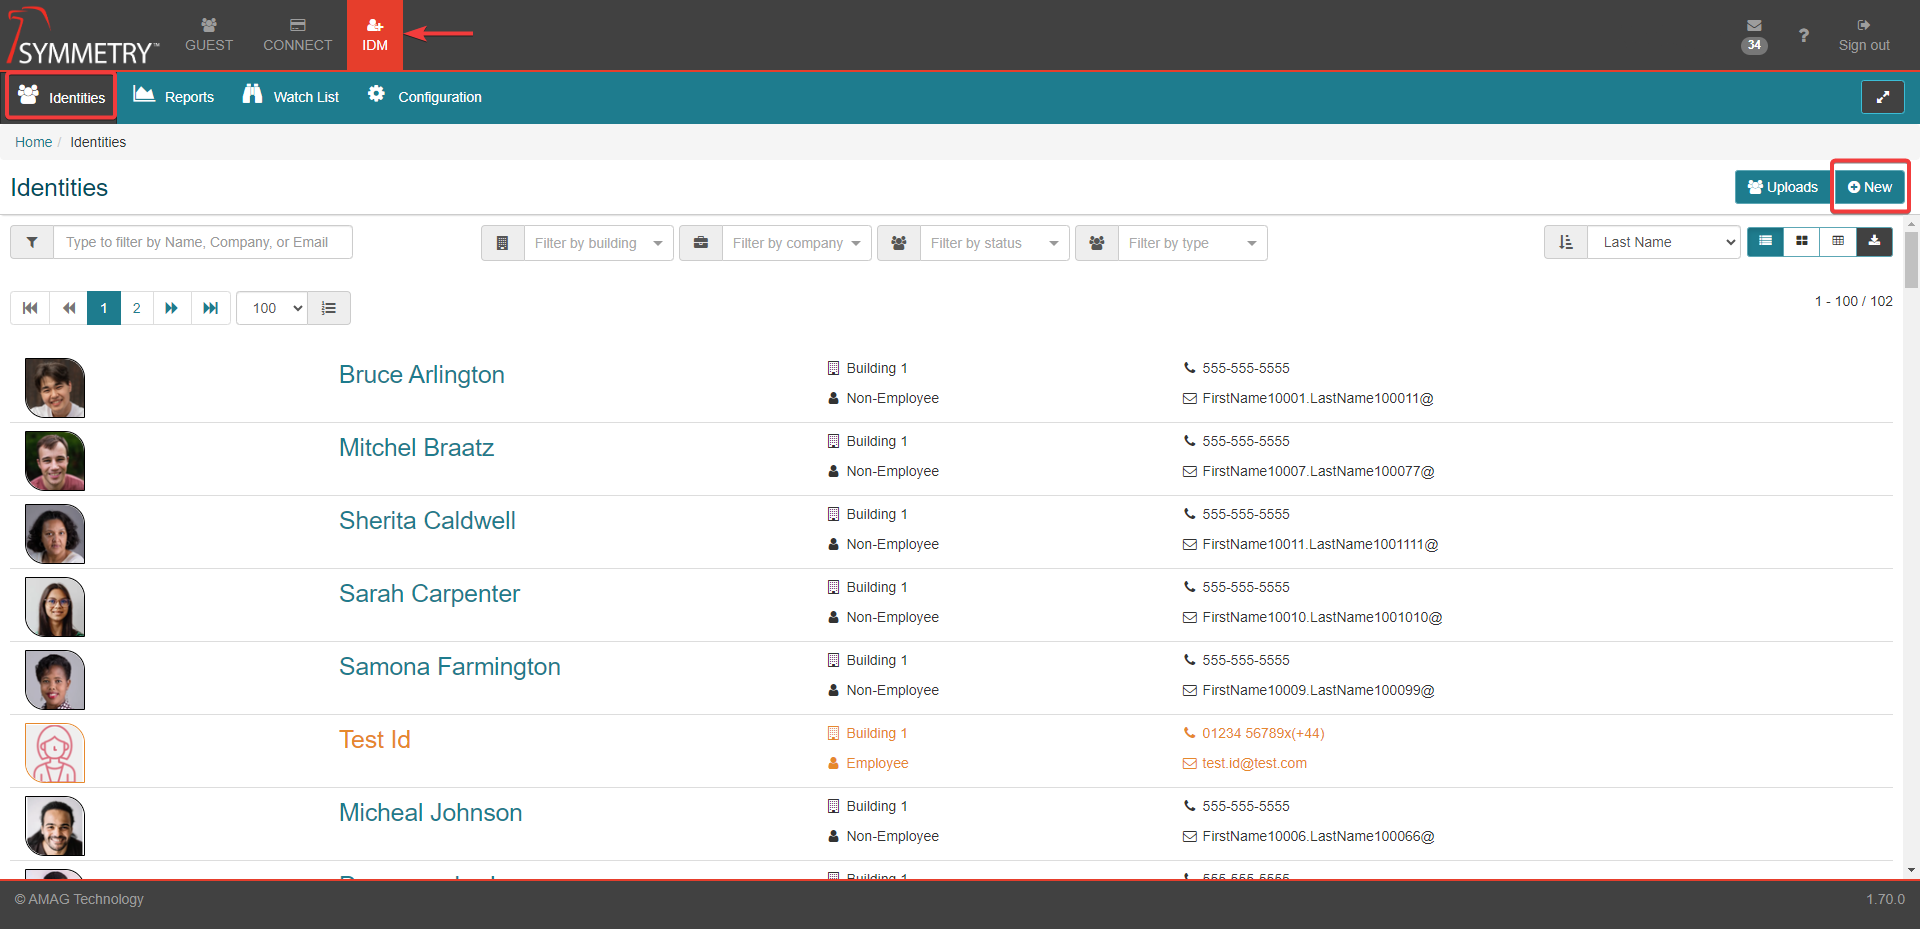
The Identities tab is where all Identities in the system are displayed. From here you can:
View identities
Add a new identity (manually or via upload)
Update an existing identity
Assign IDM roles
Add or remove WEB access
Terminate an identity
Suspend an identity
Delete an identity
Note
If company partitioning is enabled, the user will only be able to see and edit the identities that belong to the companies they have access to.
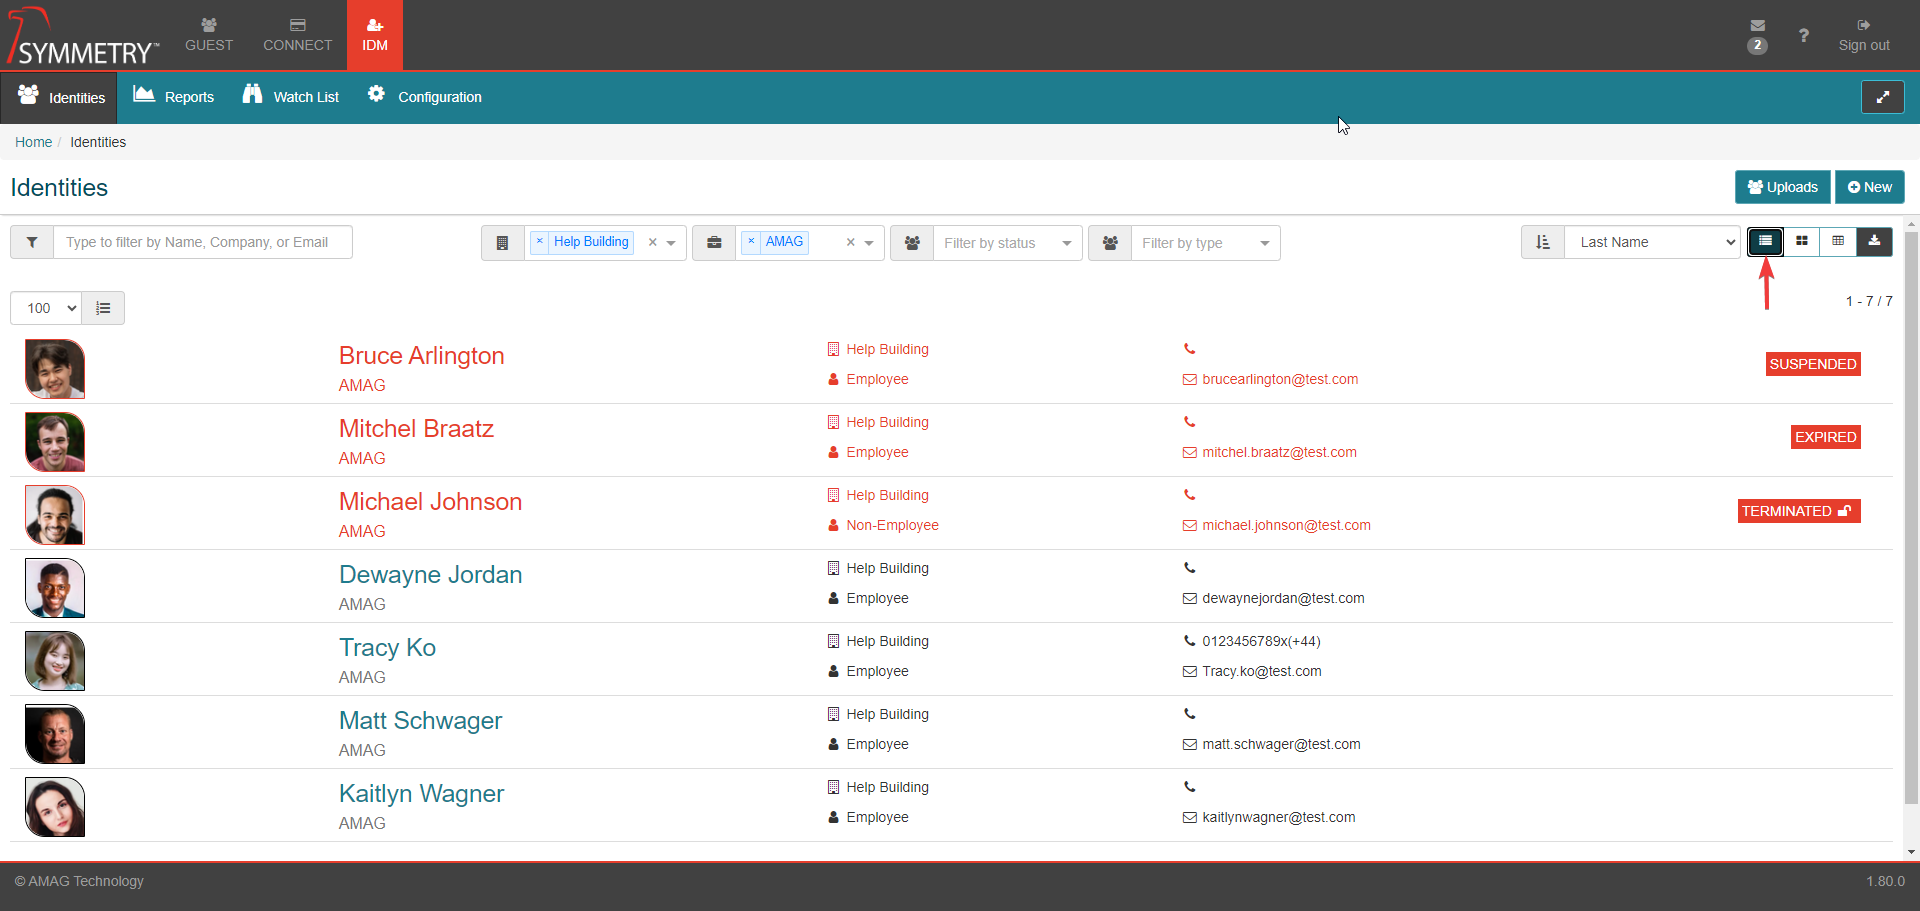
View Identities
The default view of the Identities page is a list view of the identities. This view displays one identity per row. Each row displays the following information:
Identity Image or initials when an image is not available
Identity Name
Company Name
Building the identity is associated with
Identity Type (employee or non-employee)
Identity phone number
Identity Email
Identity Status (only displayed if the identity is not active - Expired / Terminated / Suspended records will display in Red)
Note
If the identity is displayed with orange text, it signifies that the Identity will expire within the next month.
Other view options include:
Grid View: This view will display each identity in a tile format in a grid. This view displays the following information:
Identity Image or initials when an image is not available
Identity Name
Building the identity is associated with
Identity Type (Employee or non-employee)
Identity phone number
Identity Email
Identity Status (only displayed if the identity is not active - Expired / Terminated / Suspended records will display in Red)
Note
If the identity is displayed with orange text, it signifies that the Identity will expire within the next month.
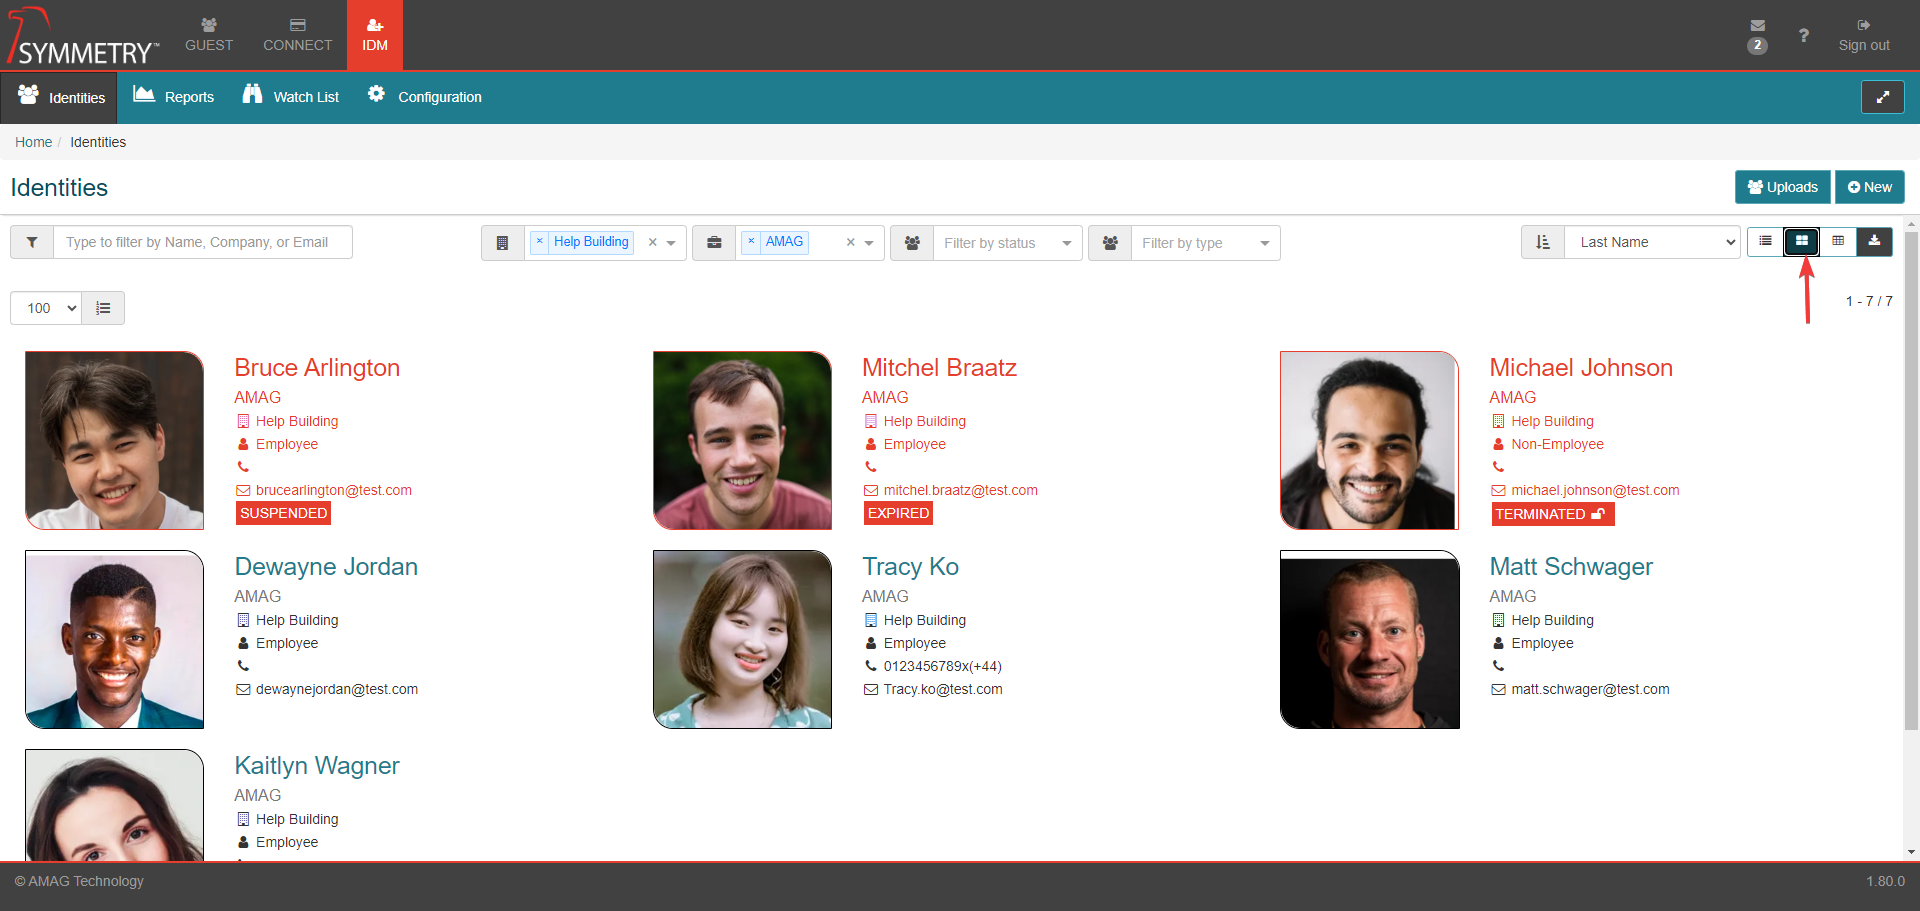
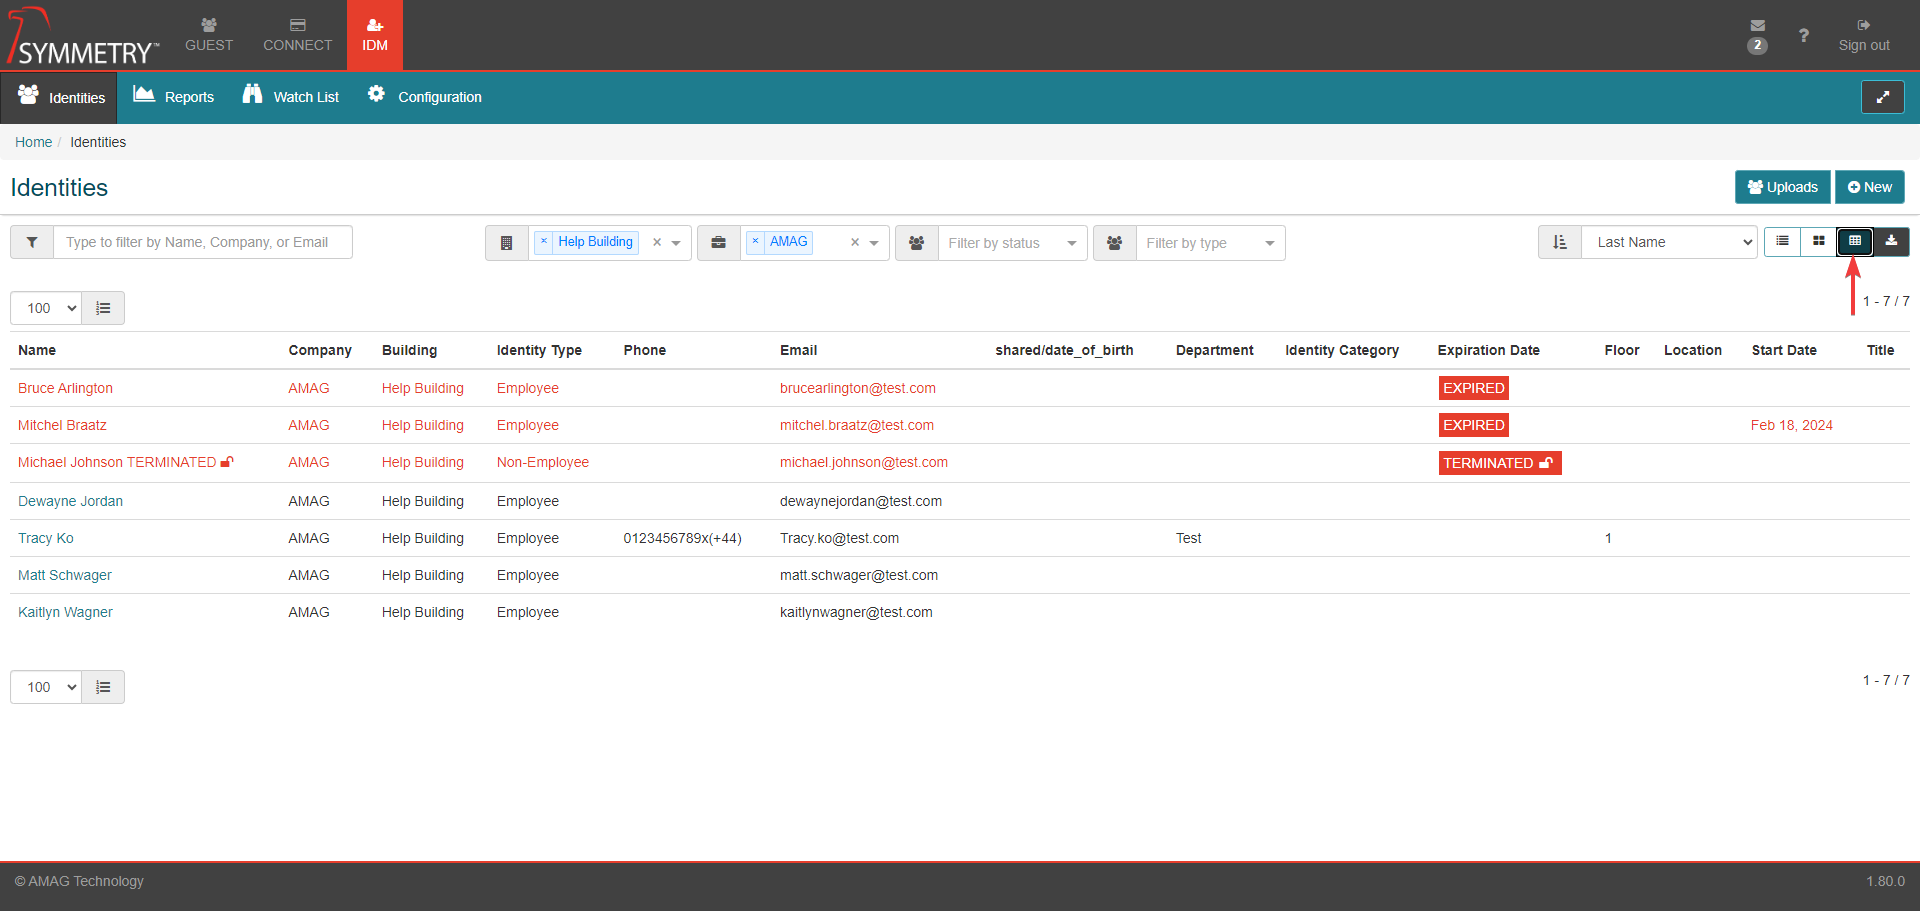
Table View: This view displays each identity in a table format.
Identity Name
Identity Company
Building the identity is associated with
Identity Type (Employee or non-employee)
Identity phone number
Identity Email
Identity Department
Identity Category
Identity Expiration Date (if the Identity is not active then its status will appear here - Expired / Terminated / Suspended records will display in Red)
Identity Floor
Identity Location
Identity Start Date
Identity Professional Title
Identity ID Reference Number
Users are able to filter and sort data by the following fields:
Note
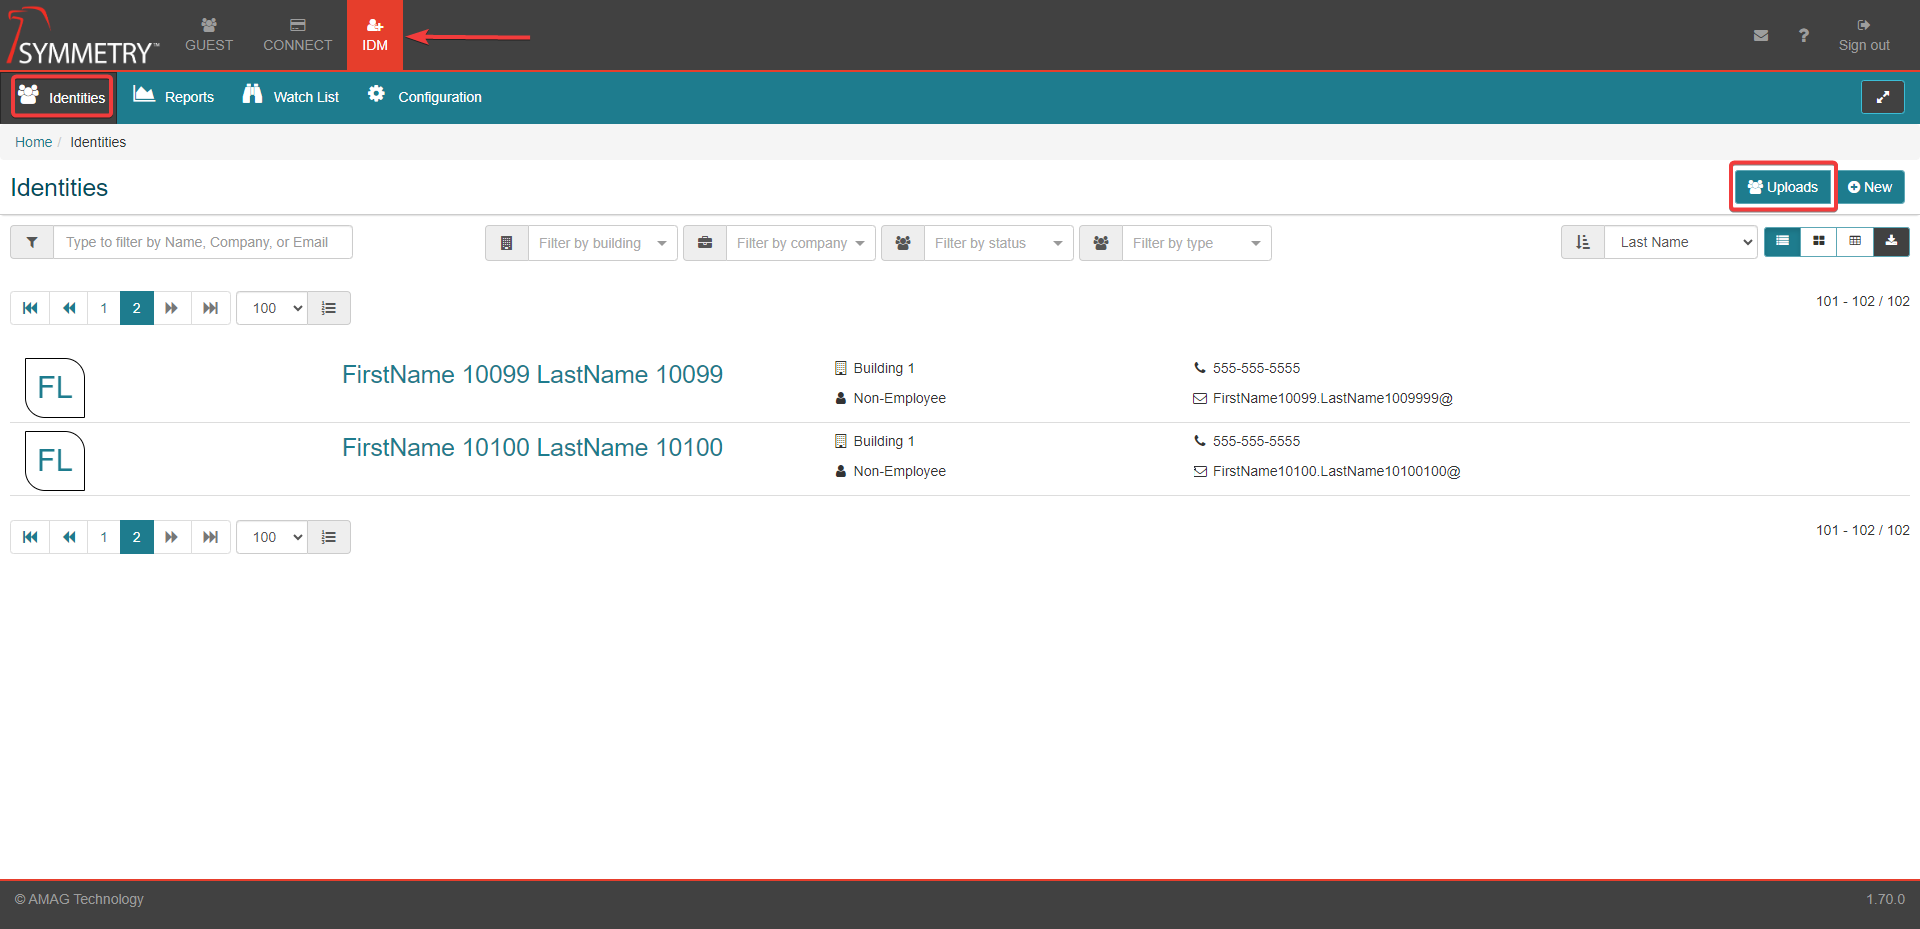
The list of identities can be displayed in groups of 10,25,50 or 100 entries per page. And can be navigated by selecting the page number or selecting next page, previous page, start or end of list.
General Filter: This is a free text filter that will search against:
Department
Email Address
Employee Category
Employee Number
First Name
Last Name
Middle Name
Primary Email
Primary Phone
Title
User Defined Fields
Filter by building:
Registered buildings within the system
Filter by company:
Registered companies within the system
Filter by status:
Active
Expired
Suspended
Terminated
Filter by type:
Employee
Non Employee
Sort by (in either Ascending or Descending order):
First Name
Last Name
Company
Building Name
Department
Identity category
Expiration Date
Floor
Location
Start Date
Title
Download Identities: Click the download icon to allow the user to export the contents of the Identities page to a .csv file.
Add a New Identity
When the user clicks the New button in the upper right corner of the screen the user will be able to enter a new identity manually. The wizard will take a user through the following steps to enter an identity: For further information, refer to Adding Identities into IDM section.
Identity: This section covers the basic identity information. The default required fields are:
Note
Additional fields can be set to required via the Screen Configuration page.
Employee, non employee
Default Language
First Name
Last Name
Primary Email
Email Type
Building Name
Company
Web User: This section is used to set up a user's web access. Here you can enter a Login Name and Password for a user or select to send the identity an email to setup their own Login Name and Password by checking the Invite Web User to Create Credentials checkbox. This section is optional and can be skipped by clicking the Next button.
Picture: This section allows you to take or upload a photo for the user. This section is optional and can be skipped by clicking the Next button.
Additional Details: This section is where any user defined fields can be entered. Any user defined fields marked as required in the Screen Configuration section will be required to be populated at this step.
Summary: This section will display all information entered. Once verified, clicking the Save button will add the identity.
Adding Identities via Spreadsheet Upload
Spreadsheet uploads provide great flexibility and ease of use without a complex integration, making this is an effective way to manage users. Spreadsheet Uploads can be used to add new Identities, or update existing Identities in the system.
To upload users via a spreadsheet, Select the IDM Uploads button.
Click the New button to configure a new upload. Download a sample template of the CSV file.
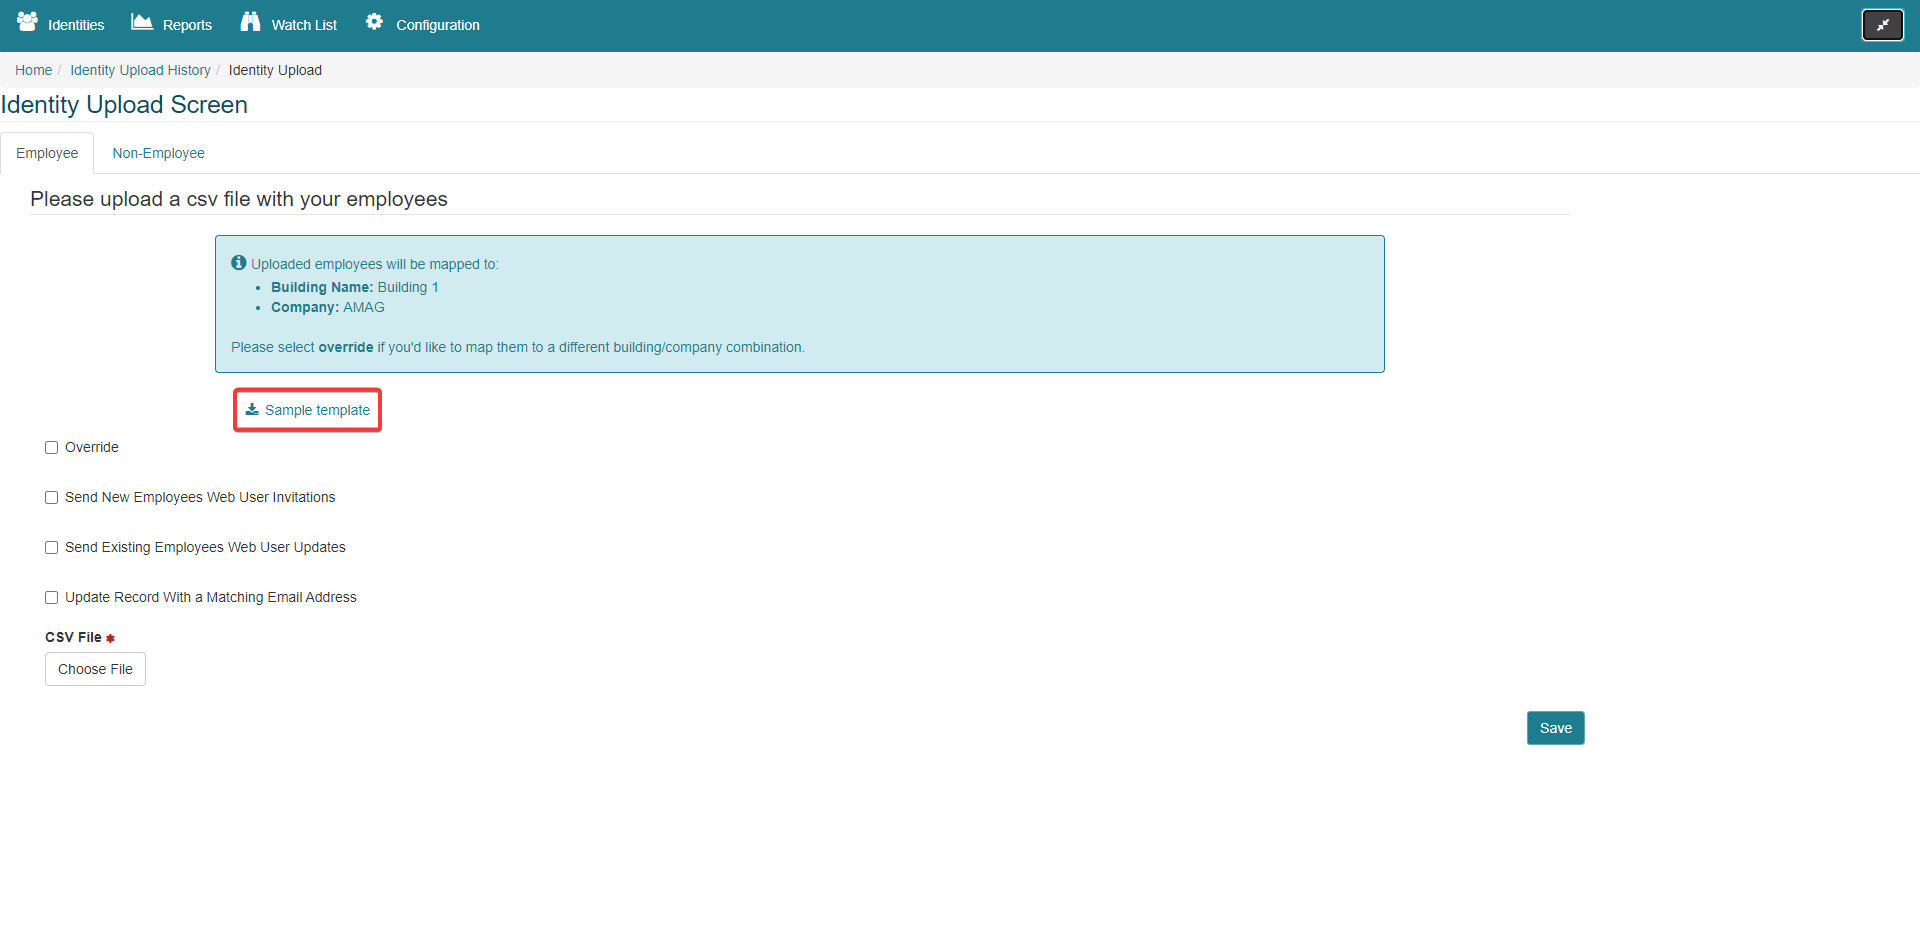
The CSV template only contains the relevant column headings and a sample row of data (provided as an example). The column name lists which columns are optional.

Enter all the required information for all Identities into the spreadsheet (overwrite the sample data provided but leave the column headings as they are) and upload the CSV file.
Note
Employee Number is typically used as the unique identifier for all Identities. If Employee Number is not present, then Email Address is used. If the unique ID in the sheet matches an existing Identity in the system, their record will be updated, instead of a new record being created.
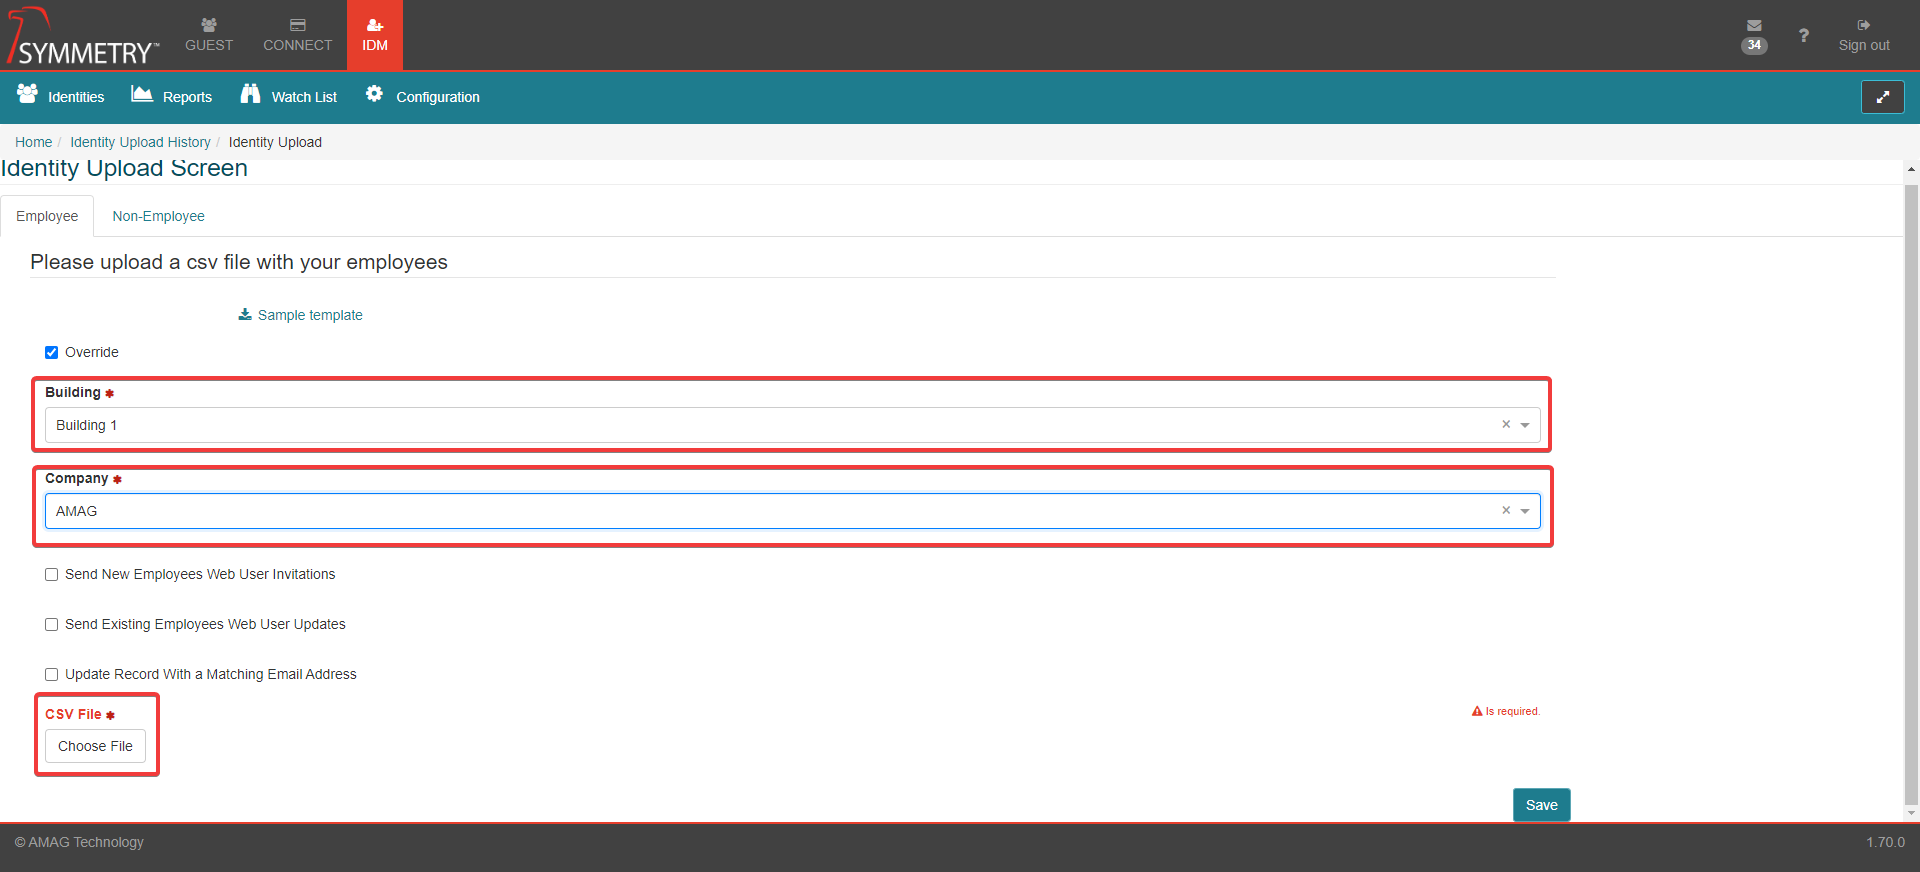
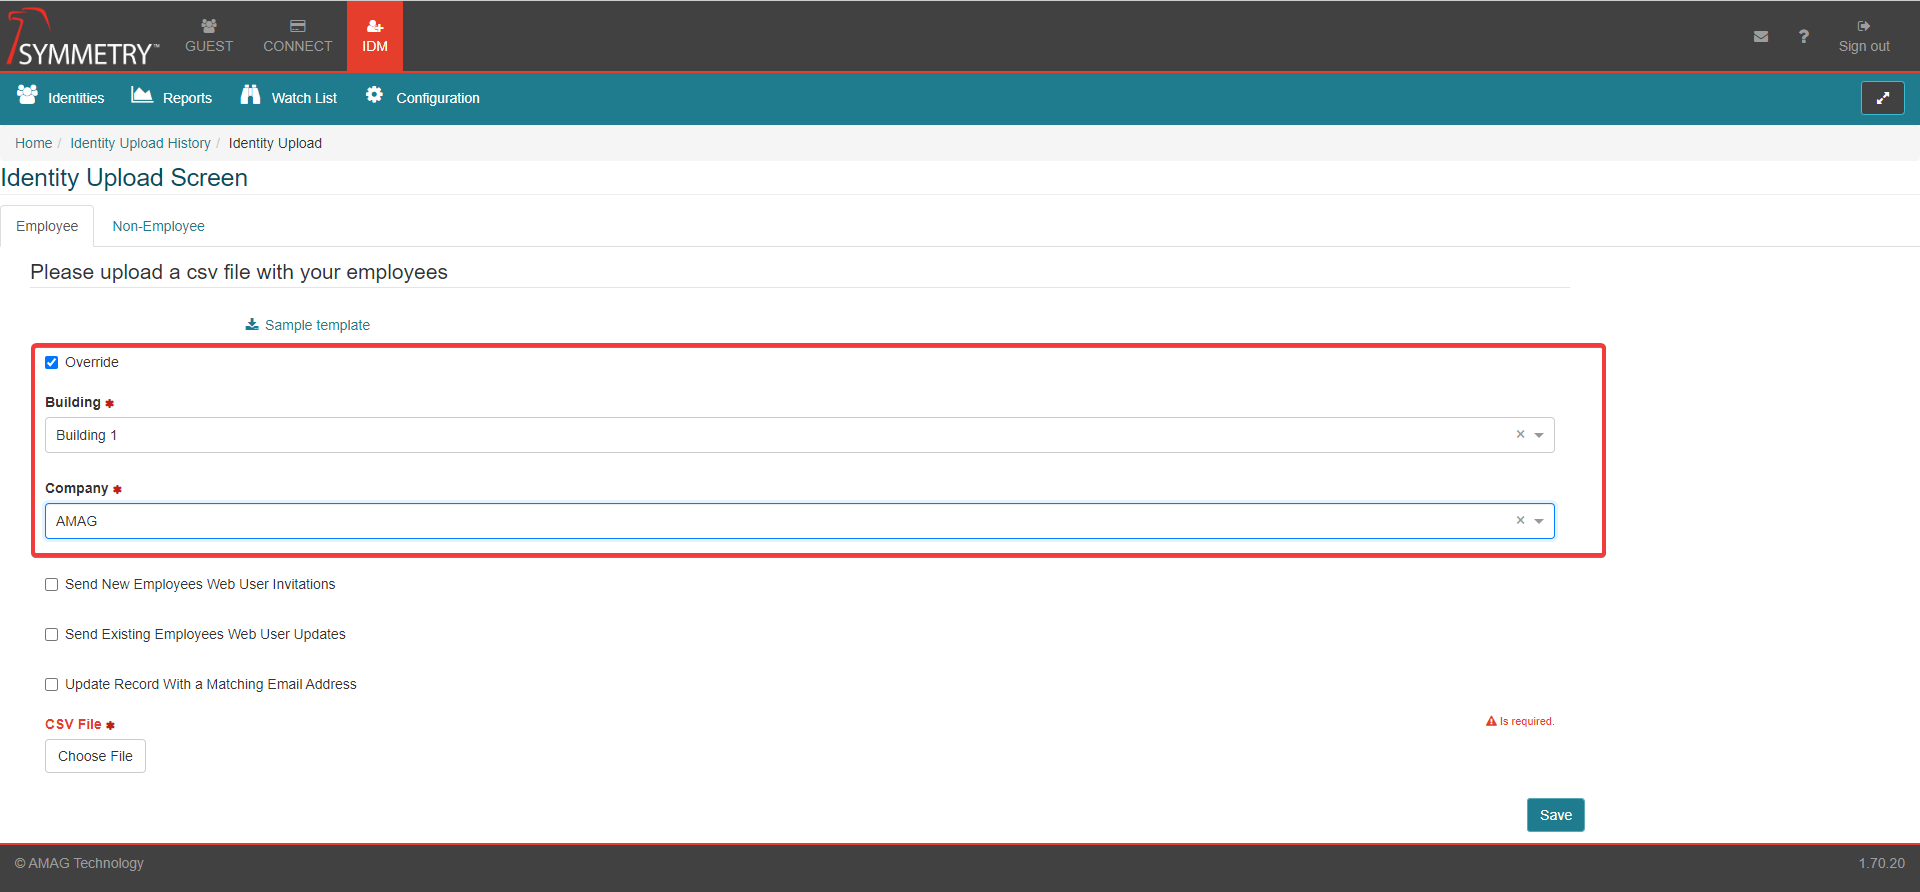
The User Interface will specify which Building and Company will be assigned to the new Identities. Select Override to change the Building and/or Company. The user will only be able to assign specific Buildings/Companies according to their User Role.
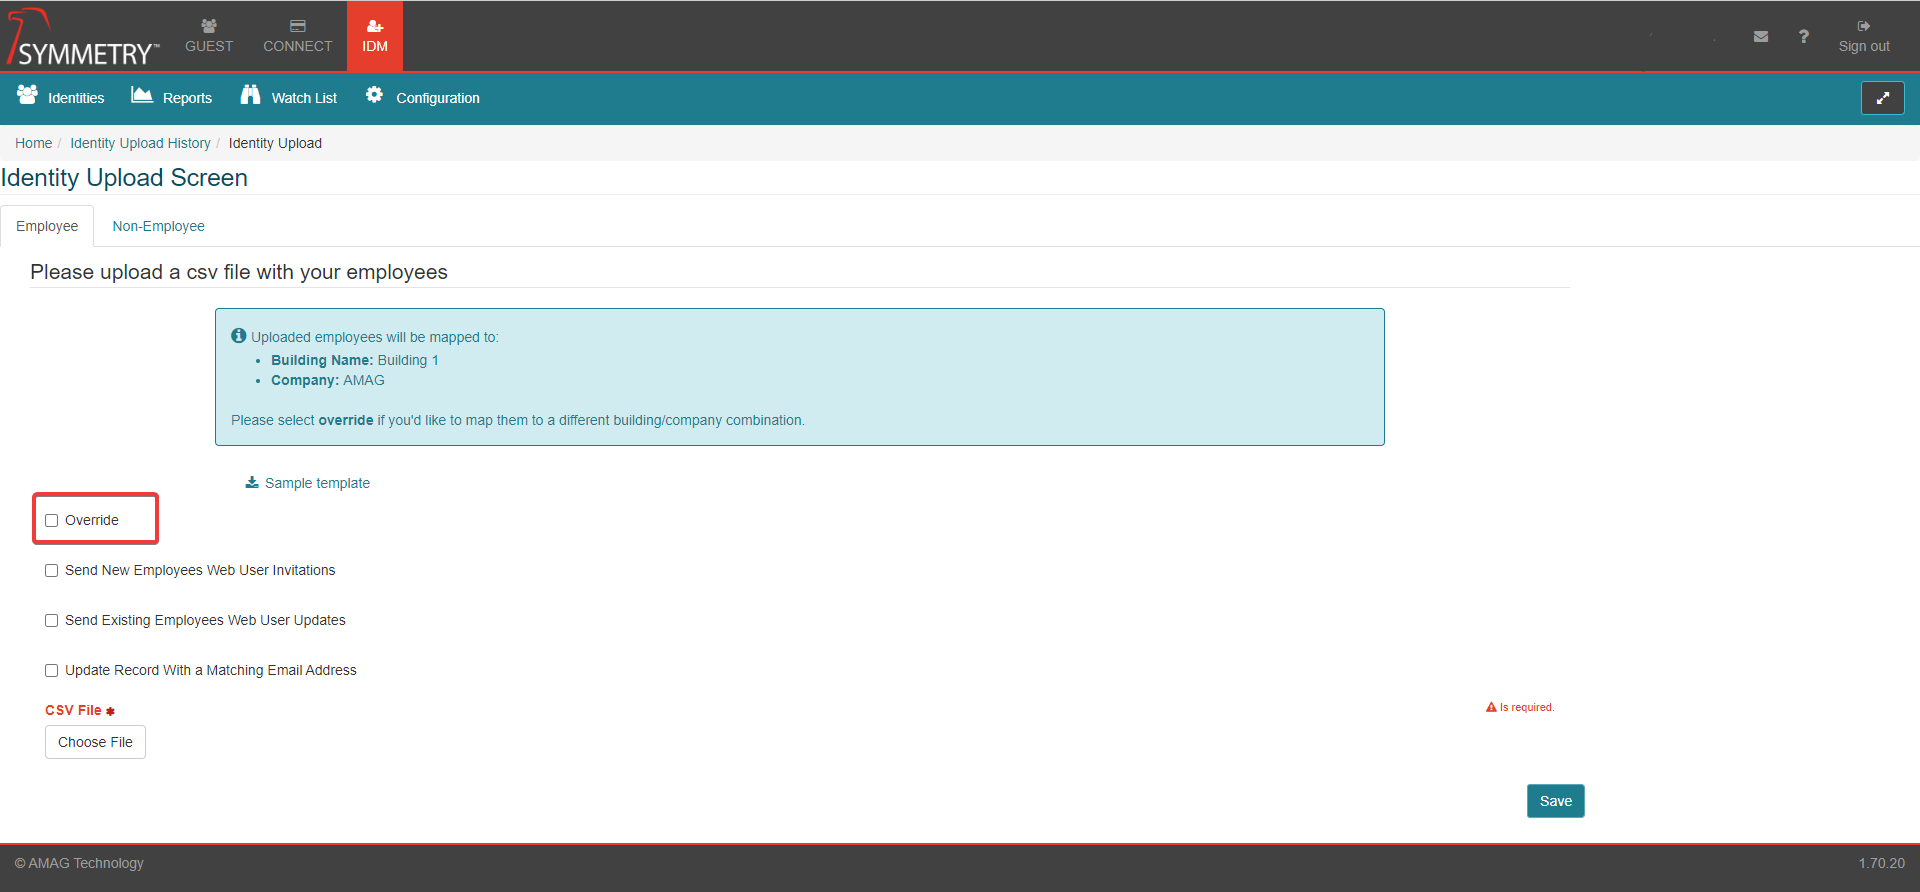
Additional Configuration Options:
Send New Employee Web User Invitations: By selecting this option, email invites are sent to all the new users uploaded in the spreadsheet, allowing them to set up their own login credentials.
Send Existing Employees Web User Updates: If the existing users were updated via upload, this option allows them to receive an email allowing them to create/update their login credentials. This can be used for example if the existing users were not sent the registration email when they were first added into the system.
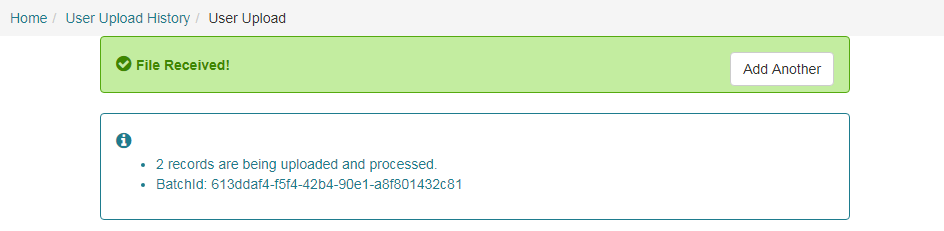
Click the Save button to upload the file. The application displays File Received along with the number of records being uploaded and processed.
The user will see the results of their file upload. If there are errors, then any records with errors will not be uploaded. Records with no errors will still be successfully uploaded. A error file will be generated in an excel format. Open the download and the last column will display the error message, confirming the type of error for each of the records on the error file.
Update Existing Identity
The following sub sections are all functions of the Identities section that can only be made to already existing Identities.
Assign IDM Roles
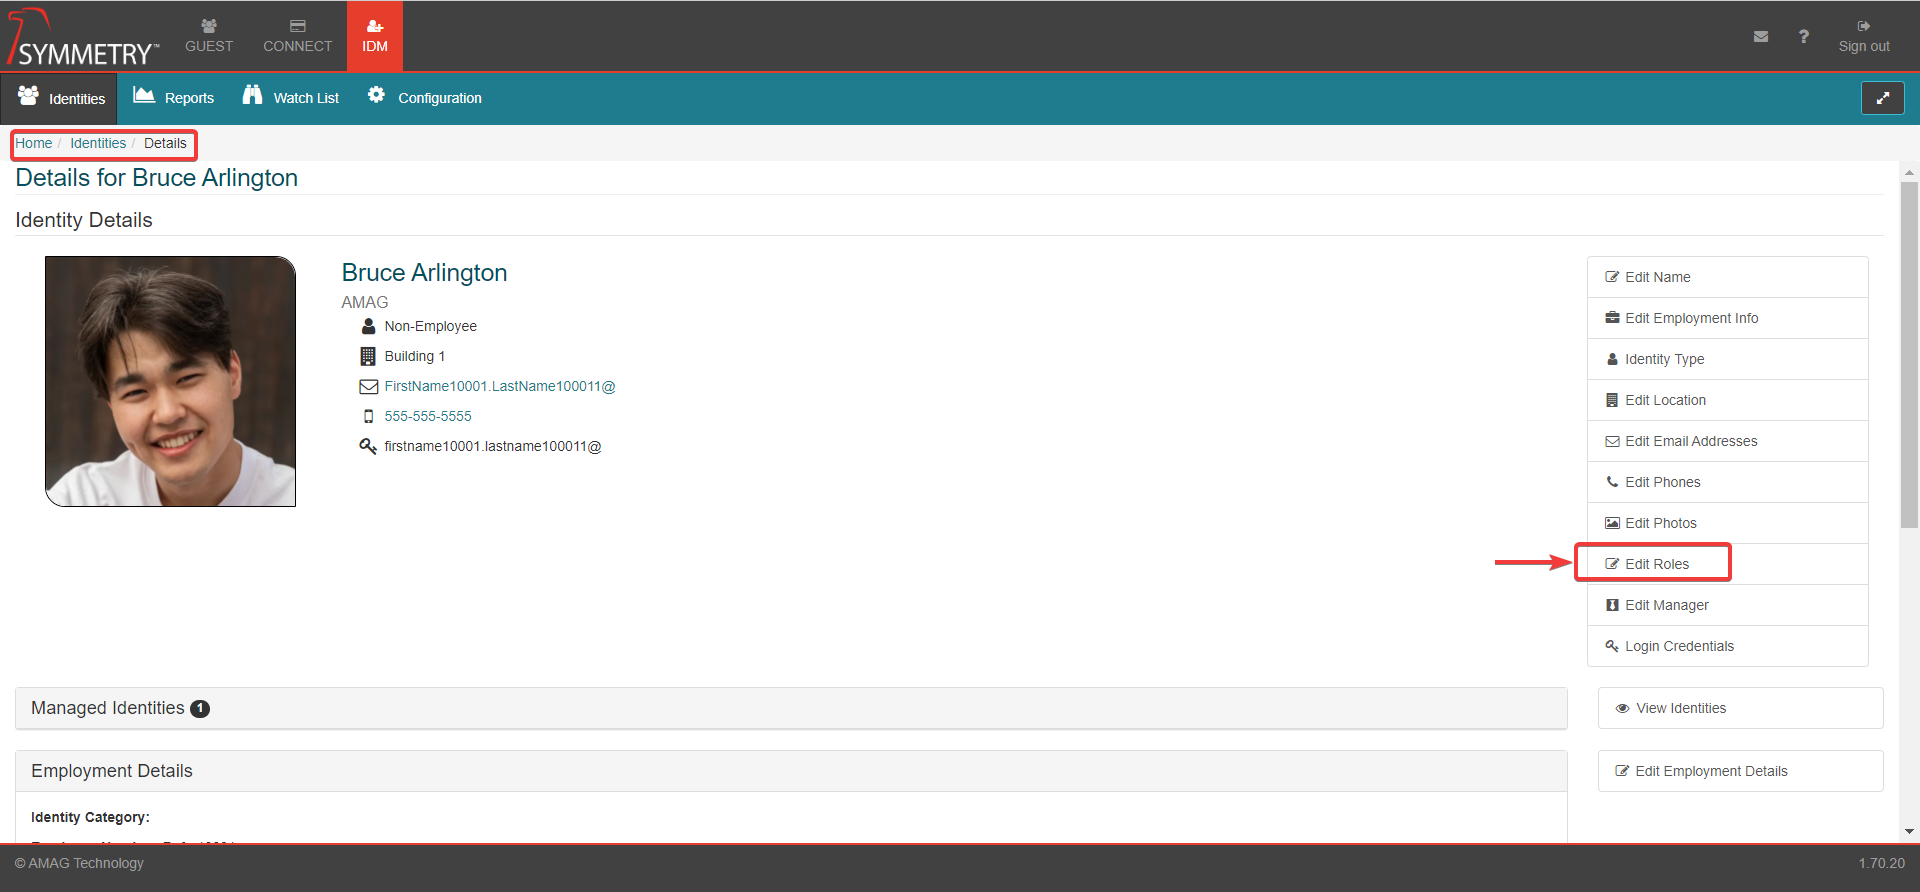
Clicking the Edit Roles button will bring you to Role Manager page for the identity. Here you can select what roles the user holds. Roles correlate to actions that the user will be able to take in the application. By default a new identity will not have any role in IDM. Available roles include:
System Administrator: Role holders represent the administrators of the system. These role holders can do anything in the application include change and modify configurations.
Building Manager: Role holders are responsible for one or multiple buildings. They can edit the building details as well as add/edit identities associated with these buildings.
Security Manager: Role holders are responsible for the watchlist. This role can add, edit and remove identities from the watchlist.
Report Viewer: Role holders are able to run one or multiple reports associated with one or multiple buildings.
Tenant Manager: Role holders are responsible for managing one or multiple tenants. They can edit the tenant details as well as add and edit identities associated with that tenant.
Add/Remove Web Access
One of the actions that can be performed on an identity is to Add or Remove Web Access Credentials. Only one option will be available to an identity and is based on if they currently have a web credential or not. If the identity does not currently have a web credential then a Send Manage Credentials Request button will be visible. If the user already has a web credential then a Remove Web Access button will be visible.
Expire an Identity
To manually expire an Identity, open up the Identity and click the Edit Employment Info button. An authorized user can then set a Expiration Date and click the Save button. Expiration Date can be in the past if the Identity is to be expired immediately.
Terminate an Identity
Another action that is available is the Terminate Identity button. Terminating an identity is a soft deletion of the identity. Based on configuration, they may no longer be visible in CONNECT or Guest, and will be marked as terminated in IDM. Terminated Identities can be reactivated at any time and the history of the identity will remain intact.
Note that there are two separate statuses - Terminated and Terminated with Lock. This has no impact on functionality within the UI (User Interface). If an Identity status is Terminated With Lock then they cannot be un-terminated / activated by the Application Programming interface (API) or by the IDM Importer until the lock is removed.
Note
Web Credentials assigned to an Identity will be removed on termination and will not be restored on reactivation.
Suspend an Identity
Another action that is available is the Suspend Identity button. Suspending an identity is a soft deletion of the identity. Based on configuration, they may no longer be visible in CONNECT or Guest, and will be marked as suspended in IDM. Suspended Identities can be un-suspended at any time and the history of the identity will remain intact.
Note
Web Credentials assigned to an Identity will be removed on suspension and will not be restored on un-suspension.
Delete an Identity
The final action that is able to be taken is Delete Identity button. Deleting an identity will also remove an identity from the system, however unlike terminating or suspending an identity, this is a hard delete without the ability to undelete.
